On occasion it is useful to manipulate a static model outside of the reservoir simulation deck, and then export the results into an INCLUDE file for future use in another simulation deck. Without access to commercial static modelling software, this can be a challenging task, even for simple adjustments.
Given that a static model is simply a three-dimensional matrix of numerical values associated with a set of keywords, adjusting these values to derive new values based on simple formulae shouldn’t be difficult. In theory it should be as easy as writing a basic spreadsheet. The problem is that there is no user-friendly interface to interact with individual cell data values, and given the size of many models, trying to import ASCII grid data into a spreadsheet just to manipulate it can be very difficult.
With ResInsight and the Octave scripting language, a set of tools exists to modify our static grids without commercial software. This is a powerful combination that should be readily adopted more often. The lack of documentation and initially unfamiliar syntax of Octave could be a reason that this approach has not found more popular adoption. In my own case, for quick changes it was actually easier to ask our geomodeller to make some changes and then re-export the grid, than it was to
The turning point came when trying to implement a revised saturation height function within an existing grid. To achieve this the formula needed to access the DEPTH array for each cell, and (at the time of writing) this array was not accessible within a simulation deck when using OPM Flow. I was going to have to put on my brave face and take a step into the unknown.
As expected, it wasn’t a straightforward journey. Trying to figure out how things were supposed to work was made harder by the lack of real world working examples, meaning trial and error was often needed. What surprised me though was that after a short while it ‘clicked’ and the power and utility of Octave and ResInsight was suddenly obvious.
In this post I hope to provide a simple walkthrough to installing the Octave/ResInsight environment and introduce some Octave script snippets that should be a useful starting point upon which to build your own script logic. In doing so the learning curve should hopefully be flattened considerably.
Getting the Tools Ready
If you’re not already using ResInsight then you’ll need to download and install ResInsight. Versions for both Windows and Linux are available. Since I’m running the simulations on OPM Flow through Windows Subsystem for Linux, I’ve downloaded the Windows version of ResInsight. Installation of ResInsight is a little different to many conventional Windows programs. Rather than running an installation executable that places the program into C:\Program Files and creates desktop shortcuts etc., you just need to unzip the program folder and its contents to any location accessible to Windows. I have a separate folder C:\Programs as a logical location to put any programs like this. You’ll need to set up your own desktop or Start Menu shortcuts and set up file associations for .rsp files.
The next step is to install Octave according to the Windows Installation instructions. The very latest version of Octave does not work with ResInsight and it is important to install the version that ResInsight was compiled with. At the time of writing that was version 4.0.0. Note that the link to Octave 4.0.0 leads to a file transfer protocol (FTP) site, so you’ll need an FTP client such as FileZilla to download the correct version of Octave. Note that the Windows version of Octave can be installed anywhere and does not need to reside in C:\Program Files. Make a note of where it is installed.
Once both programs are installed, you need to tell ResInsight about where Octave is located. This is achieved by adding the path to the octave-cli.exe executable in the Edit/Preferences/Scripting location as shown in Figure 1.

Note also that I have changed my script editor to use Notepad++. This is a much more powerful text editor that supports syntax highlighting. Since Octave is similar to the Matlab language, the syntax highlighting for Matlab can be used when editing Octave files.
Running a Script on a Grid
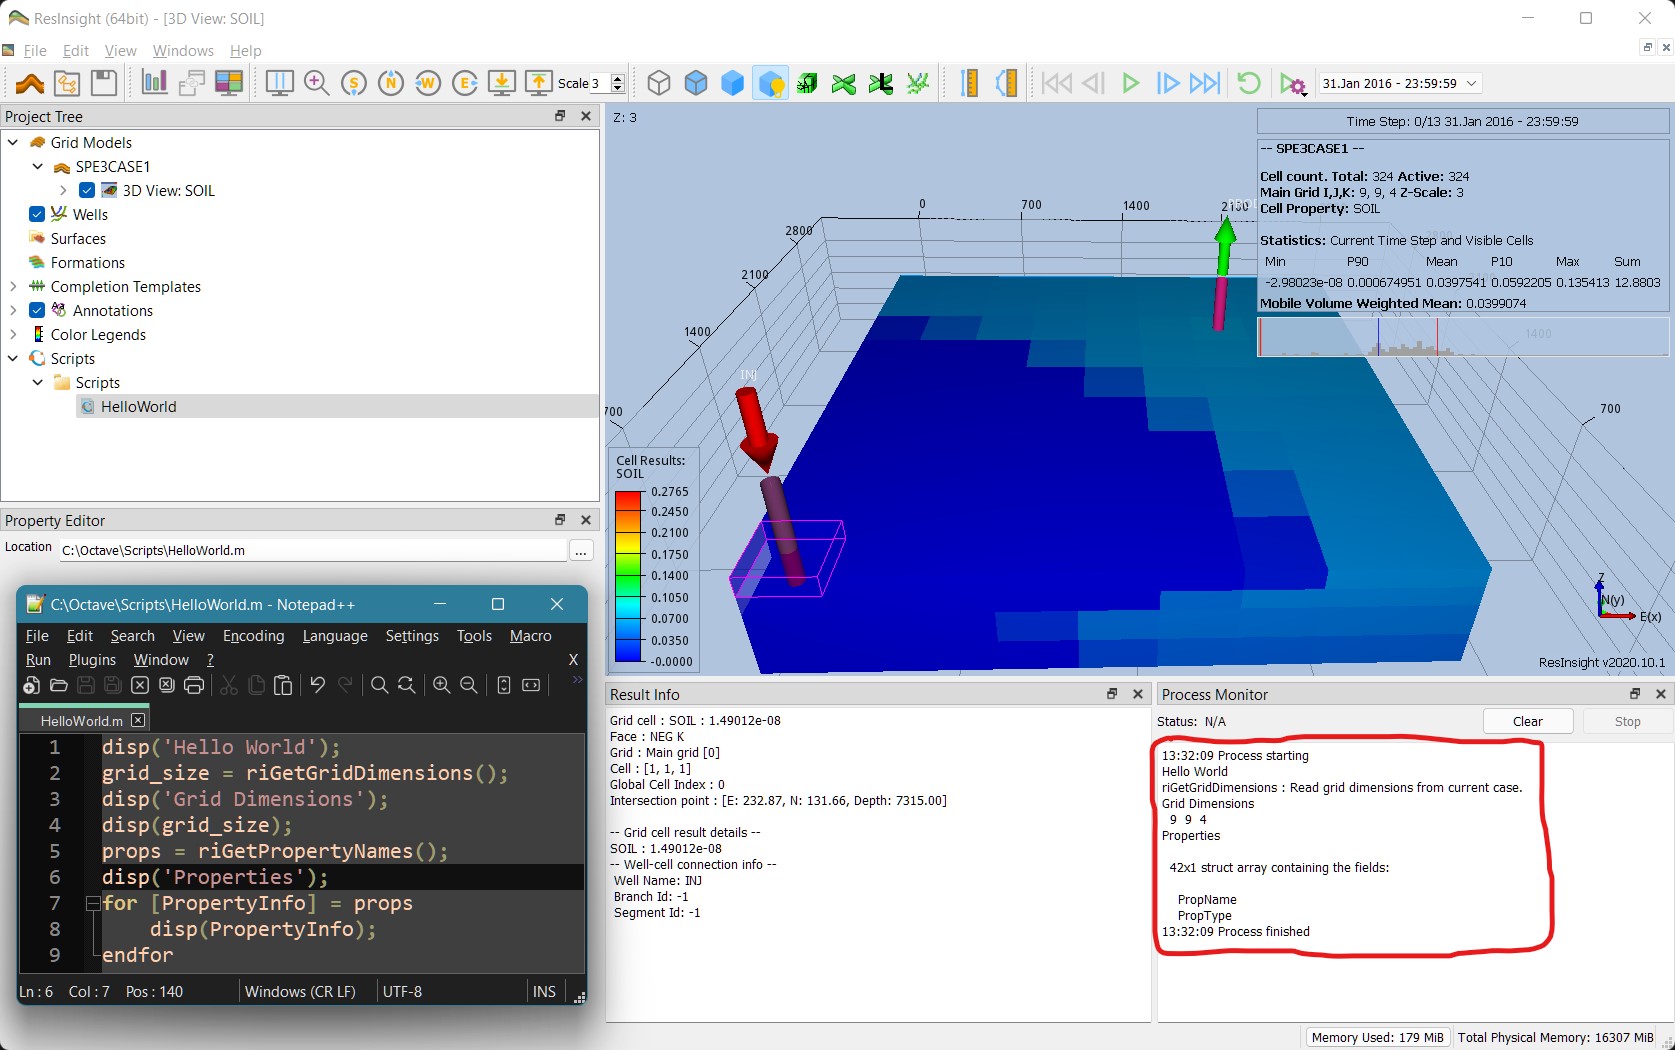
Now that our program environment is up and running, we can test that Octave is working with a simple hello world application. We need to create a file HelloWorld.m with the following (or similar) content:
%
% Display "Hello World" in the output console.
%
disp('Hello World');
This file needs to be placed into a script folder, and ResInsight needs to be told where that script folder is located. This is achieved by right-clicking the ‘Scripts’ item in the Project Tree and selecting ‘Add Script Path’. Assuming the file path to the scripts folder is correctly added, it should now be possible to navigate to the HelloWorld.m script. Right-clicking provides options to Edit or Execute the script.
The output is shown in the Process Monitor area of ResInsight. An example with a slightly more involved HelloWorld.m script run on the SPE3CASE1 simulation deck is shown in Figure 2.
Finding ResInsight Commands for Octave
Where are all the commands that can be used to interface with ResInsight using Octave documented? The Octave interface reference shows the various functions that can be used to interact with ResInsight and the grid. Alternatively, because ResInsight is an open source project, anyone is free to inspect the source code. This means that information about each command can also be discerned by examining the source code. The structure of the documented functions can be a little intimidating to those without good programming experience as it shows the function structures without any explanation as to the syntax. For the uninitiated, the use of square brackets to represent both arrays and optional arguments is potentially confusing.
I’ve attempted to explain the syntax in the illustration below:
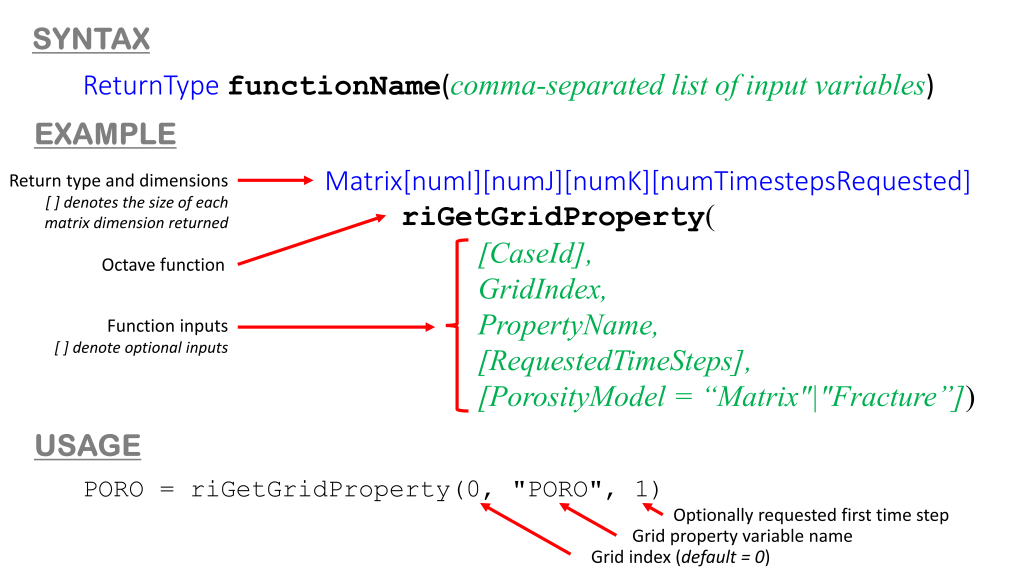
The overall syntax is quite simple, even if the reference for each command appears complicated. The syntax breaks into three components:
- Return type: Each function may return a result with a given type. These types are typically
MatrixorVector. The size and number of dimensions for the return type are denoted using square brackets, where the number of square brackets indicates the number of dimensions and the value within each square bracket is the size of that dimension. It is possible that there is no return type (for example with a function that sets values in the grid). - Function name: The ResInsight function name. The ResInsight-specific function names can easily be distinguished from general Octave functions as they all start with the letters
ri. The function is always followed by two curved brackets containing the input variables. - Input variables: This is a comma-separated list of variables. For some functions there are required variables, and optional variables. The reference distinguishes between these two types by encasing the optional variables in square brackets. When passing variables to the function, strings (in quotation marks) and numbers (decimal digits) can be used in addition to variable names.
Useful Approaches to Writing Octave Scripts in ResInsight
When modifying an existing static grid there are a few common steps that are used in manipulating the grid:
- Accessing cell properties: Static models have properties associated with the grid e.g. the cell size (
DX,DY,DZ) and depth (DEPTH) of the cell, in addition to properties associated with each cell e.g.PORO,PERMXetc. Accessing these values is an essential part of creating new variables that depend on them, or simply to modify them. - Applying a formula to all grid cells: A geocellular model contain many cells or blocks. Often we want to apply a formula across all the cells in the model, not just a selected few.
- Using logic to select and apply a formula to grid cells: It is useful to be able to apply logic to select only those cells that meet a certain criteria, and to then apply a formula only to those cells that were selected.
- Create new variables: If a matrix variable does not already exist, then a new one must first be created.
Get a Specific Grid Cell Property
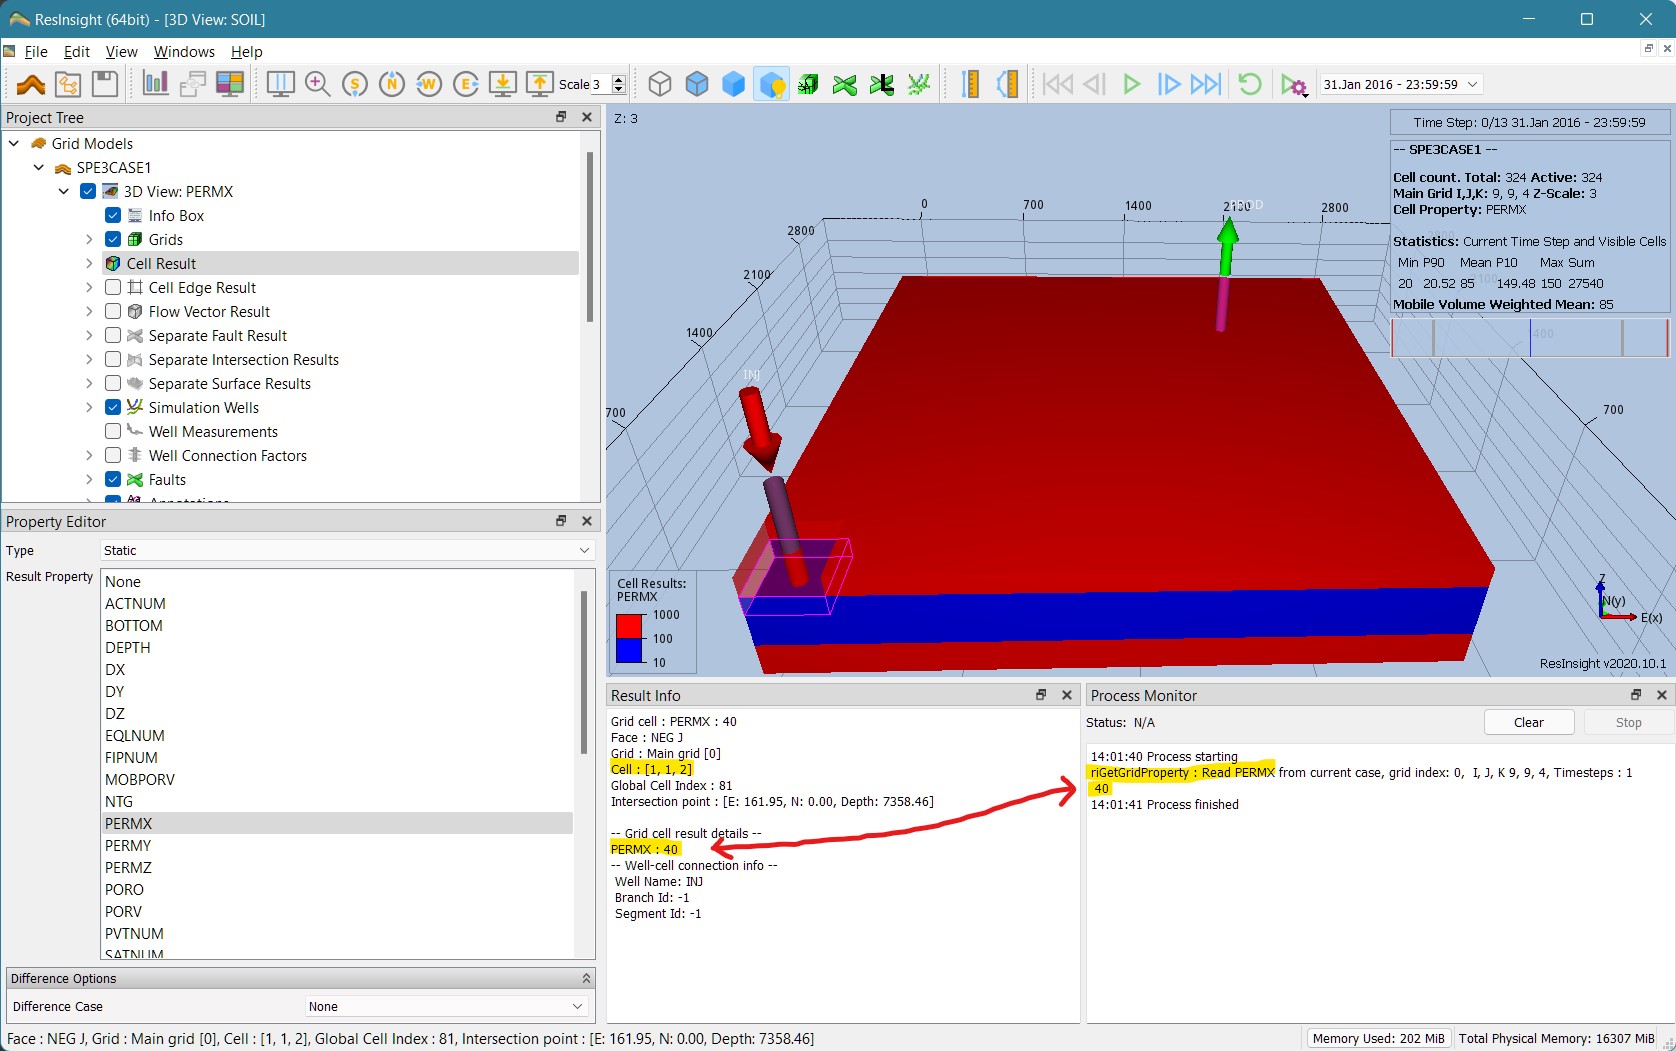
A very basic function inherent to any modification of static grid properties is knowing how to access the grid properties themselves. In the ResInsight 3D view, this is achieved by selecting the Cell Result type and then selecting the cell for which the corresponding value is needed. The details about the cell and its value are shown in the Result Info section.
Within an Octave script, we use the riGetGridProperty function. In addition to the property identified (“PERMX”), we must also specify which Grid Index is being used and the Timestep at which the value is being extracted. For static properties the values should not change with time, so the first timestep = 1 can be used.
The following example shows how to access the permeability in the first cell of the second layer.
PERMX = riGetGridProperty(0, 'PERMX', 1);
disp(PERMX(1, 1, 2));
A comparison to the ResInsight result when querying this cell versus the same result obtained using this Octave script on the SPE3CASE1 model is shown below:
Apply Simple Arithmetic to Every Grid Cell
A key aspect of Octave scripts is that it is generally slow to iterate over an array in comparison to using vector operations. It is quite common that we might want to apply a formula to very single grid cell. In many programming languages the way to achieve this would be to iterate over each I, J, K dimension and apply the formula to each individual cell. Octave has element-by-element arithmetic operators which allow an arithmetic formula to be applied to each element in a matrix without having to iterate over it.
As a trivial example, consider a porosity multiplier. The wrong way to do this (although it will work) is to iterate over each cell:
%
% Wrong way to apply a porosity multiplier to all cells in a grid.
%
porv_mult = 1.1; % set pore volume muliplier to 1.1x
PORO = riGetGridProperty(0, 'PORO', 1);
for i = 1:size(PORO, 1)
    for j = 1:size(PORO, 2)
        for k = 1:size(PORO, 3)
            PORO(i, j, k) = PORO(i, j, k) * porv_mult;
        endfor
    endfor
endfor
Rather than iterating over all the cells it is easier to use the element-by-element multiplication operator .* on the porosity.
%
% Better way to apply a porosity multiplier to all cells in a grid
% (notation is more compact and will execute faster).
%
porv_mult = 1.1; % set pore volume muliplier to 1.1x
PORO = riGetGridProperty(0, 'PORO', 1);
PORO = PORO .* porv_mult;
Note that in these examples the PORO matrix is changed and the new values can be accessed in the script. The actual PORO values in the static grid are not changed. To get the changed values it is necessary to use the riSetGridProperty(PORO, 0 ,"PORO", "Matrix"); command. This will create a duplicate PORO variable which is a Generated type, as opposed to a Static type.
Select Cells Matching a Given Criteria and Manipulate Them
Perhaps one of the most common logic applications in any program is to identify if certain conditions are met, and to take a specified action if they are. In the case of our static grid, we might want to determine which cells meet a condition, and to then iterate over all those cells and apply a formula, leaving other cells intact.
Conventionally, in other programming languages, the approach would be to iterate over all the cells. For each cell a boolean expression is evaluated, and if the result is true then an action is taken for that cell.
In Octave a different approach can be used, which is arguably more efficient. First we find the indices for all cells that match our criteria. Then we apply the action to this group of cells. There are built-in commands in Octave to achieve this. As always, an example is the best way to illustrate what is meant:
%
% Find all cells with porosity less than 5% and set permeability (PERMX) to zero
% for those cells.
%
I = find(PORO < 0.05);
PERMX(I) = 0.0;
Note that the variable I here is all the indices that match the specified criteria. When accessing variables using this notation, the expression is evaluated for each element that in the group defined by I. Therefore the element-by-element arithmetical operators are not required.
To illustrate, consider the porosity multiplier example from above. If, instead of applying a pore volume multiplier to all cells, it was desired to only apply a multiplier to certain cells (say above 5% as per the example just used), then instead of using PORO = PORO .* porv_mult; we can use:
PORO(I) = PORO(I) * porv_mult;
Create a New Blank Array Sized To Match the Grid
With Octave variable types are automatically determined. This is arguably preferable for a scripting language as it removes the overhead of needing to explicitly define everything in a strongly typed language. If I need a new integer variable, I should be able to just write it e.g. i = 0.
But what if a new matrix variable is needed with a size that matches the grid? If the new variable is defined with another matrix, then it may be possible to create it using element-by-element operators. To instantiate an initially empty matrix, this approach will not work as the interpreter will not be able to infer the variable type.
The solution is to get the grid dimensions and then create an empty matrix using the Octave zeros function.
%
% Get the static model grid dimensions.
%
grid_size = riGetGridDimensions();
disp('Grid Dimensions');
disp(grid_size); % optional output of grid dimensions (useful for debugging)

%
% Create an empty matrix with the same size as the grid.
%
grid_property = zeros(grid_size(1), grid_size(2), grid_size(3)); % instantiate empty matrix
This new matrix variable can now be used with other matrices or variables.
Conclusions
The combination of ResInsight and Octave allows adjustments to be made to a reservoir model’s static grid without having to use the software that was originally used to create the grid. The Octave language is matrix-aware so it allows for powerful manipulation of the grid without having to iterate over all the cells individually. Whilst the language may seem unfamiliar at first, it is a sensible choice of language for writing scripts that manipulate matrix data, such as that found in 3D static models.