Many years ago, after I had graduated from university, I put together my first DIY PC from parts that I had purchased. Since then the computer I am writing this blog on is essentially the same computer, but all the parts have been changed out at some point several times over. In essence when new parts are introduced the computer is still the same computer, but when every single original part no longer remains – is this still the same computer? It’s something of a philosophical question. On one level the software e.g. data and programs has been carried over, and upgraded through Windows XP, Windows 7 and now Windows 10, so you could argue that the “soul” of the computer is fundamentally the same, and therefore its identity remains the same.
When I built that first PC, as a young engineer starting out in the oil and gas industry, money was tight. A “budget build” was a necessity, and I spent a long time reading through forums and web pages about which parts to specify. I was also intrigued by the world of overclocking, and avidly read many forum posts over at Overclockers Australia (OCAU) whose site I see has a very familiar look and feel to it as when I used to peruse their forums. At the time AMD had just released the Athlon which was cheaper than Intel for similar performance, and it would overclock quite readily for even better performance. So the Athlon formed the basis of the very first incarnation of my desktop PC in 1999. At the time it felt like a bold step not to go with Intel and the familiar Pentium-based CPUs of the era.
Quite satisfied with the performance of the original Athlon, the next upgrade saw an adoption of the Athlon 64 CPU in late 2004. This processor would form the solid foundation of a custom watercooled system for several years, and catalysed an entry into the world of case modding. I even purchased a jigsaw to put a cutout into my case so that I could top-mount a 120 mm radiator for the watercooling. This was in the days before all-in-one water coolers, and involved use of an aquarium pump and modified car radiator. The setup lasted a few years, but maintenance was continually needed, and water cooling lost its attractions.
Unfortunately AMD’s dominance started to fade as the race for ever higher and higher clock frequencies started to butt up against thermal limitations. In response Intel moved towards multi-core machines, and it was the Core 2 Duo in 2006 that stole the march on AMD who were then left playing catch up for the next decade (my wife had one of these in an Intel iMac that eventually had Linux installed on it after I got frustrated by the MacOS). By the time I came around for the next upgrade around 2010, Intel were the dominant force in processors, and I reluctantly put a Core i5 750 at the heart of the next PC evolution. It was good, and it worked, but not supporting the underdog felt almost criminal. If I was going to go to the effort to build my own PC, surely I should be using something a little out of the ordinary.
Building Around the AMD Ryzen 7
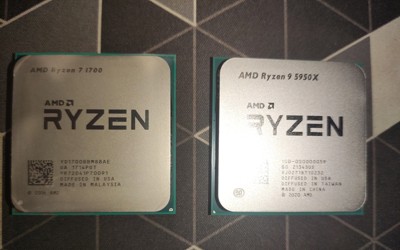
Fortunately the next time it came to build generation IV of my PC, AMD had been making headroads with their Zen architecture and excitement was growing about this CPU. I was also long overdue for an upgrade, although it must be admitted that the Core i5 had performed admirably for its lifespan. With my attention occasionally turning back to the Pyrus Suite and in particular the possibilities of parallel programming, I wanted to get a serious multi-core machine. In an unusual step, I purchased a Ryzen 7 1700 very soon after they came out, and set about building around this chip.
Specifying The Parts
These days I am no longer constrained by the compromises required for a “budget build”, but with a family and kids the budget is not unlimited. Nonetheless a solid “enthusiast build” is the target which aims to put together nearly the best performance from consumer level parts, without paying top dollar for the very top end parts or server-grade (a.k.a. “prosumer”) components.
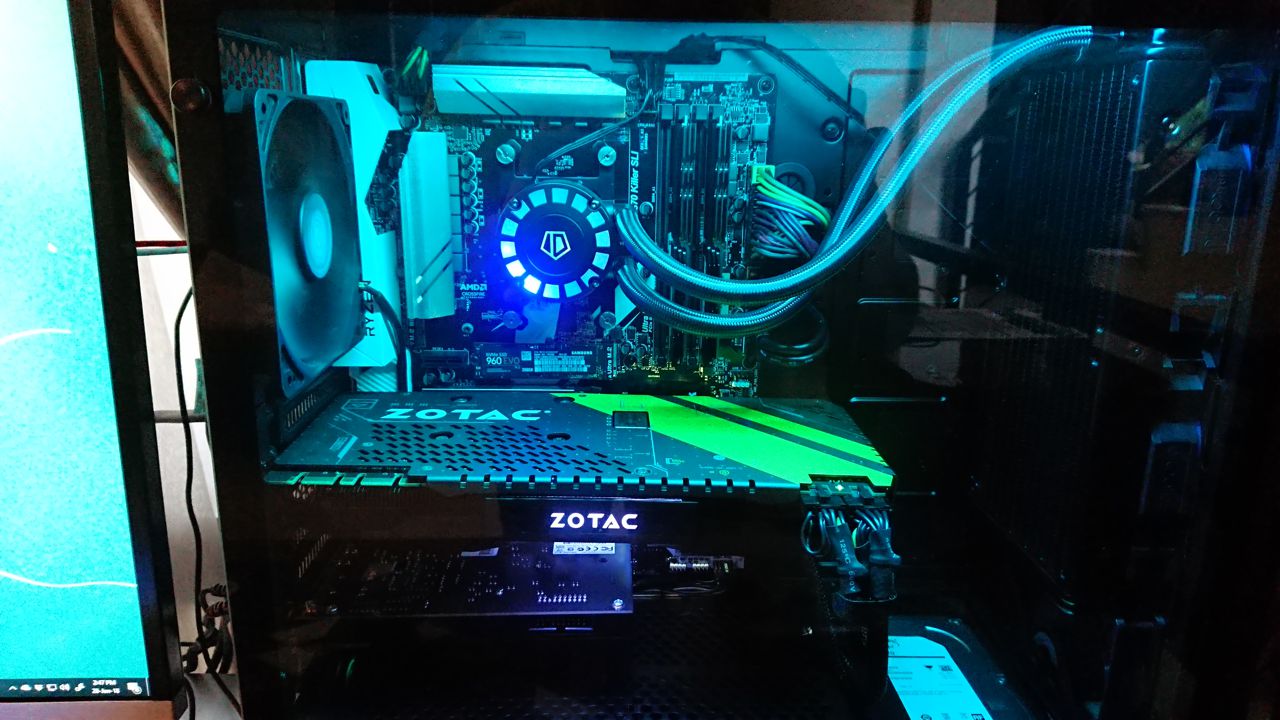
As an engineer this is always a lot of fun researching the components and determining what the best combinations might be. Inevitably there are problems encountered along the way, and this requires further research to fix. Fortunately the internet is so much larger today in comparison to when I built version I of the PC. I’ve tried to put a lot of newer technologies into the build, including NVMe boot drive and AIO water cooling housed in a tempered glass side-window case.
In the end the goal I set myself was to build a PC with similar performance to the top-tier Ryzen 7 1800X CPU, better than 1080p HD graphics, hi-fi quality audio capable of running and playing any of the current games on the market today. Specifically the machine would also be used for coding of oil and gas tools, and give me the encouragement to dabble with OpenGL and OpenCL, with the goal of writing my own compositional simulator.
Build Challenges And Going Esoteric
There are a few aspects of the build that are a little more involved in comparison to simply ordering the parts and putting them together. These are component areas where I have either spent a little more than typical, or took an unusual route to procure the component.
-
Video Card: This is a near top-end Nvidia GTX 1080 manufactured by Zotac. The card has performed well and is near silent in operation, but the issue was related to procuring it. At the time Ethereum was rising in prominence, and machines to mine this digital currency could effectively be put together using multiple GPUs. You might think that in Singapore’s Sim Lim Square, a huge IT centre, it would be easy to find a graphic card? You’d be wrong. All the mid-end cards were sold out, and most of the high-end cards were all that remained in the few stores that still had stock sported asking prices that were generally much higher than I had anticipated.
-
Audio System: I’ve always firmly believed that audio is just as important as video. If you’re going to spend a lot of time, money on effort on making sure the graphics are up to scratch, then you ought to take a similar interest in the sound. Gone are the days of 8-bit audio (although some of it was good), but without a decent amplifier and speaker set-up, you’ll never get high fidelity. I’m running a dedicated Pioneer integrated amp, with Wharfdale speakers. To get the signal to the amp it is necessary to use a soundcard with RCA output connectors. It is surpisingly difficult to find these. I had originally intended to get an Asus Essence STX, but these also proved difficult to find. In the end I resorted to my second choice of a Creative Sound Blaster ZxR which has the same signal to noise ratio of 124 dB. I can safely say that the audio quality is worth it.
-
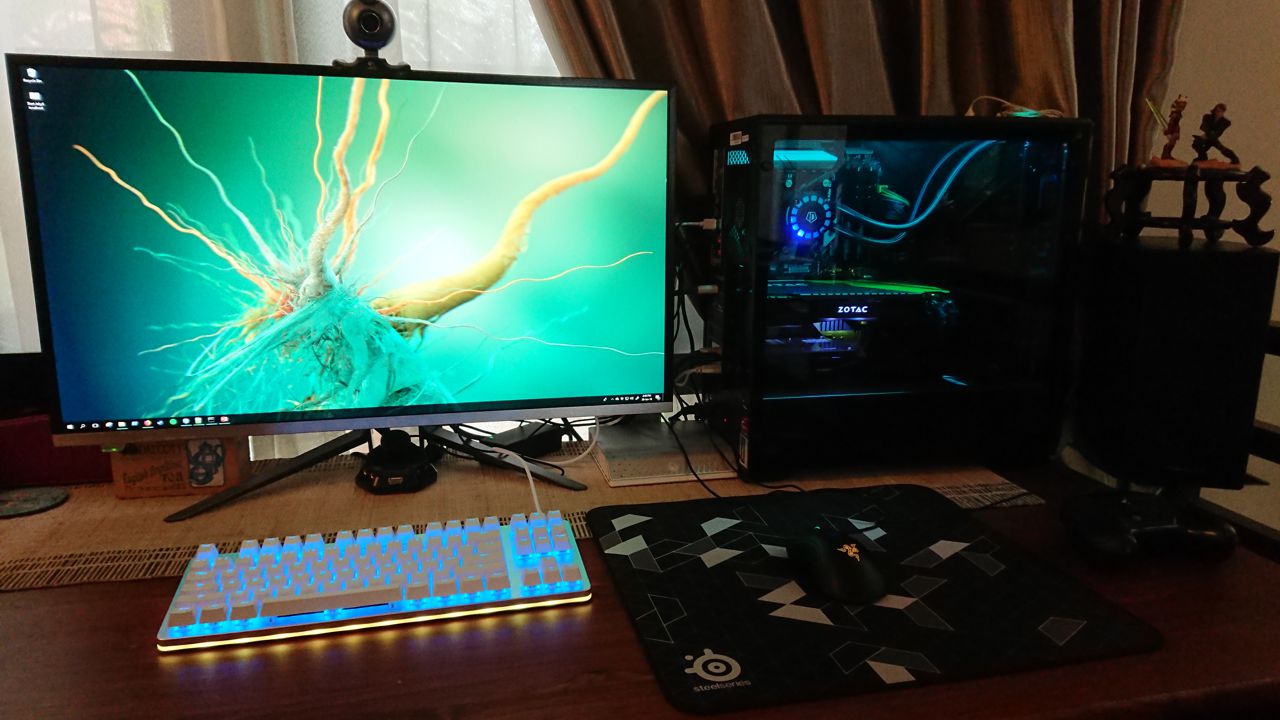
Monitor: With a good video card, it makes no sense to use an average monitor. After all their is no point having a great quality image if you can’t enjoy it to its full potential. For me that means accurate colour representation and high contrast. Blacks should look really deep black, not some washed out grey hue. Having heard that good deals were available buying a Korean monitor (essentially using the same panels that go into better known brands, but without the marketing overhead), I found an importer of these and purchased a Crossover 32SS, which is a 1440p A-MVA+ panel which allegedly rivals or beats IPS in terms of RGB colourspace. The monitor that arrived was solid, and so far has no dead pixels or any other niggles. At half the cost of similar ‘gaming’ monitors in Singapore, I can hardly complain. Using the monitor’s inbuilt utility, the screen has been overclocked to 75 Hz, so higher frame rates are possible.
-
Keyboard: Most of the interaction made with a computer comes through the keyboard. Sure, the mouse is important, but the tactile feedback comes from the keyboard. Once upon a time all keyboards used mechanical switches, and these had a definitive action to them. I had sort of missed that technology moved on, and membrane style switches were now used in most keyboards. These switches are much cheaper to make, and because the keys can be thinner they are pretty much the only option for laptops. Actually it gets worse because with touchscreens we’ve now done away with the keys altogether, and just mash the screen. In researching the available keyboards, I discovered a whole cult world of ‘mechanical keyboards’ and was drawn to one particular model, the K-Type aluminium RGB mechanical keyboard. Ordering the keyboard meant pledging to purchase one months in advance and then waiting, not knowing if it would ever arrive. Now that it’s here I love typing on it. The feel is just right.
The Completed Build
Putting it all together was straightforward. Everything fit first time around, probably because I was using a mid-size case. I settled on a turquoise and yellow colour scheme. This is a little unusual but looks striking.
One of the nice benefits is that moving from 2x 24” monitors to 1x 32” monitor frees up more desk space, and now allows the build to be displayed on the case. The more compact 10 keyless layout of the K-Type keyboard also allows the use of a larger mouse mat.
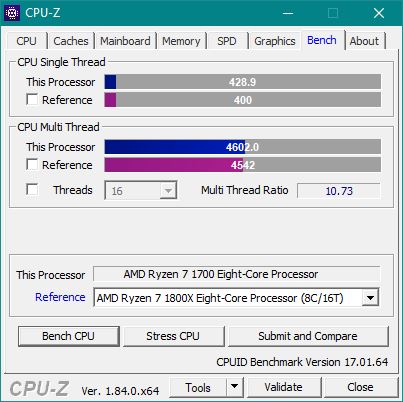
The build works well. Using CPU-Z to do a basic benchmark against our target Ryzen 7 1800X system, we can see that we have matched the performance of that processor with our cheaper 1700. Nice.
Overclocking Experiences
If building the new machine was straightforward, getting it all to work to the maximum of its capability was most definitely not. Overclocking is made quite easy these days, but if you don’t take understand what you are doing then there is always the danger that you’ll brick the machine. A few times I’ve had the computer just refuse to start up, and when you can’t even get into the BIOS screen, that is when the panic starts! – CMOS reset jumper is usually the trick if you run into this problem.
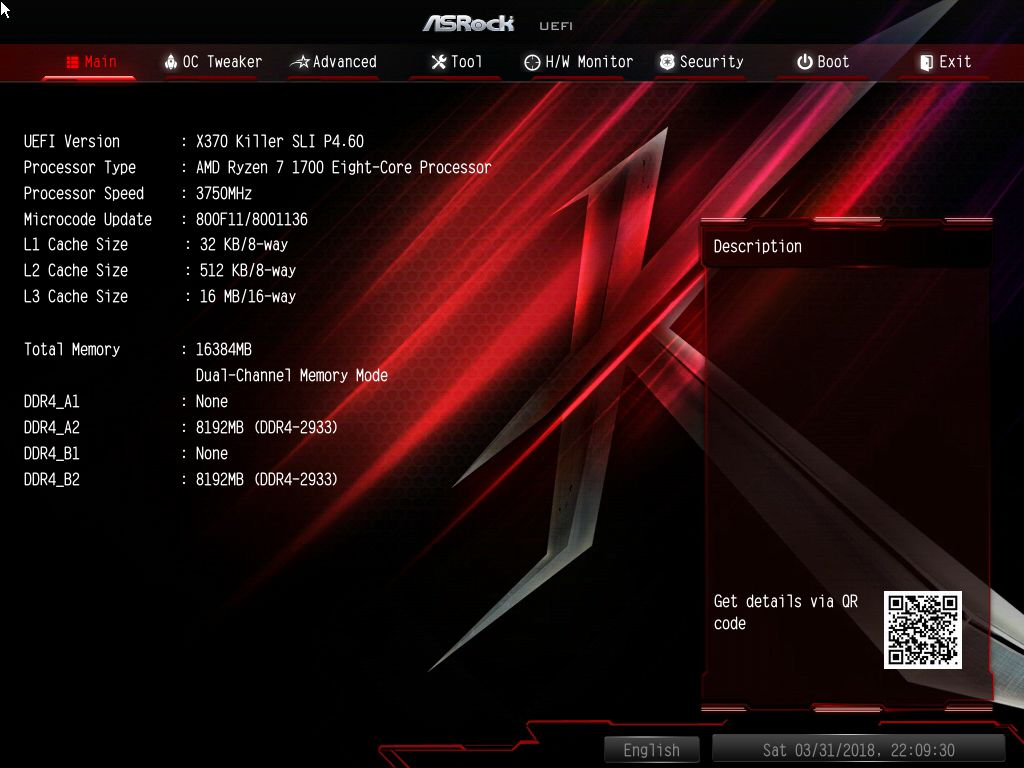
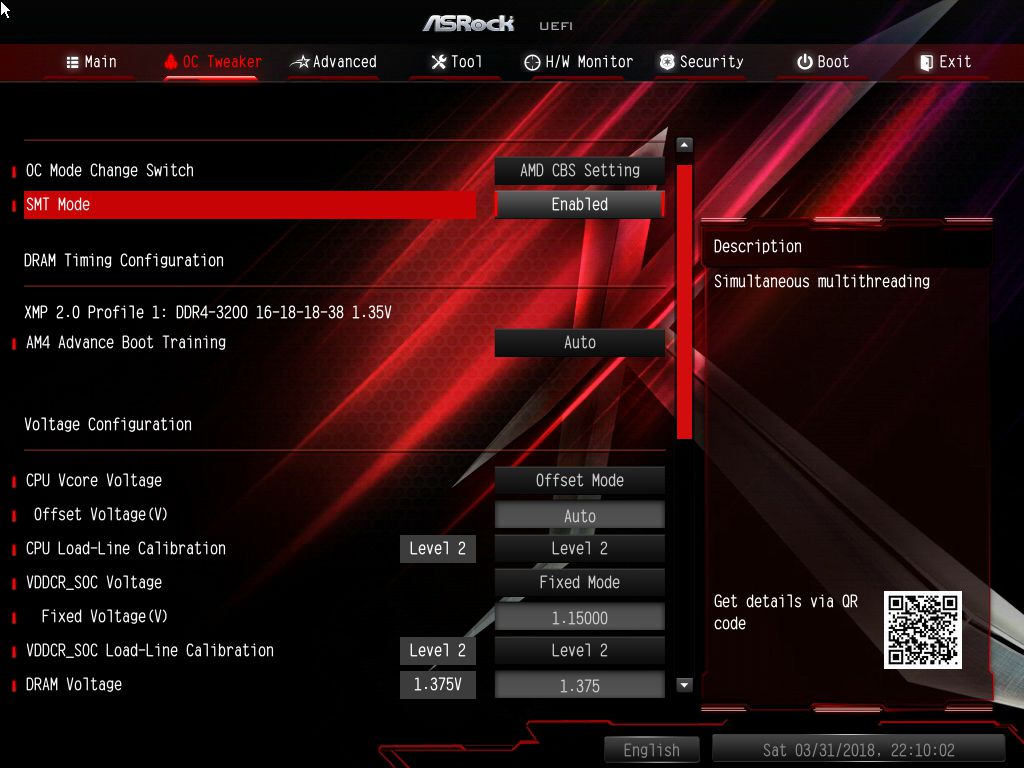
I’m running an ASRock X370 Killer SLI motherboard with Ryzen 7 1700 CPU and 2x 8GB Trident Z RAM. I’ve managed to get a reasonably stable configuration running all 8 cores at 3.75 GHz, and with p-states enables so that downclocking when the CPU is not under load is possible. This reduces the power consumption, and heat generation, thus reducing the fan speeds needed for cooling and letting the computer run much quieter. Early BIOS released with the motherboard did not work perfectly. In particular setting p-state 0 would not allow a custom voltage, which meant you had to run in CPU voltage offset mode, and apply a large offset to get the desired voltage. Something of a clunky workaround, but it worked. With the latest BIOS 4.60, everything is now working.
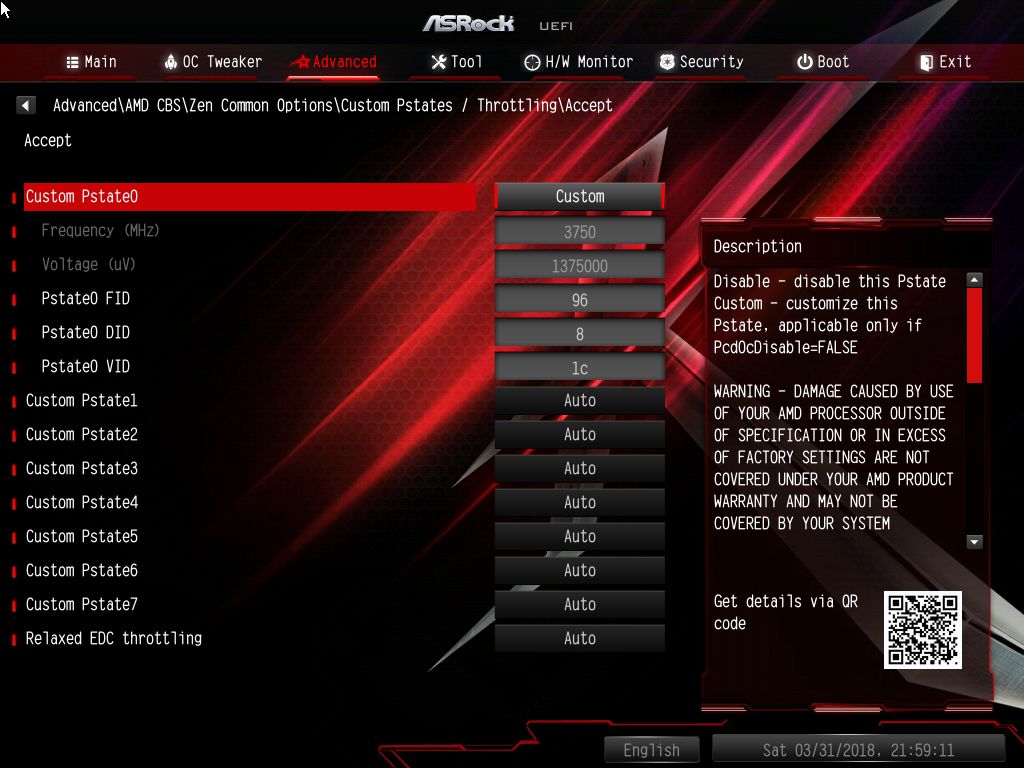
In the updated BIOS 4.60, to set p-state overclocking it is necessary to use AMD CBS mode for overclocking. This can be found at Advanced/AMD CBS/Zen Common Options/Custom Pstates. Set the CPU voltage to Offset mode, with Auto offset value.
In the CBS settings, set the P0 state to your desired overclock. Leave other p-states unchanged. The two values that you need to change are the VID and FID which are the voltage and frequency multipliers respectively. I have set VID to 1.375 volts (VID = 0x1C in hex) and FID to 37.5 (FID = 0x96 in hex).
One of the biggest challenges with the new Ryzen processors has been memory support. Most memory it seems has been set up to work well with Intel systems, but getting memory to run at its rated speed on AMD is more hit and miss. With a little bit of overvolting, I’ve been able to get my Trident Z sticks to boot at 3000 Mhz, but this does not appear to be stable and stress testing the machine will often lead to lock ups. Part of the issue is that I have CL16 sticks, which use Hynix memory chips instead of Samsung. The latter will apparently reach higher speeds. Despite many attempts to get memory running stable at over 2933 MHz, I’ve now resigned myself to running on something that just works.
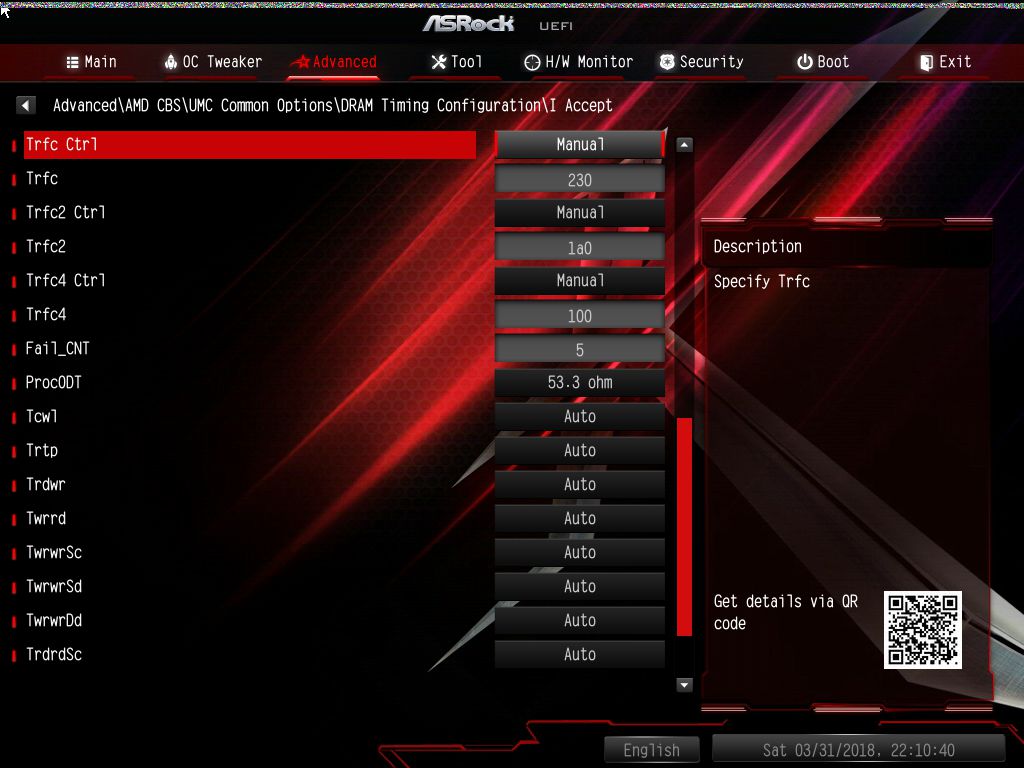
To access memory settings for tweaking you have to get into Advanced/AMD CBS/UMC Common Options/DRAM Timing Configuration. Note that the values are all entered using hex values, so my memory timings of 16-18-18-38-56 become 0x10-0x12-0x12-0x26-0x38.
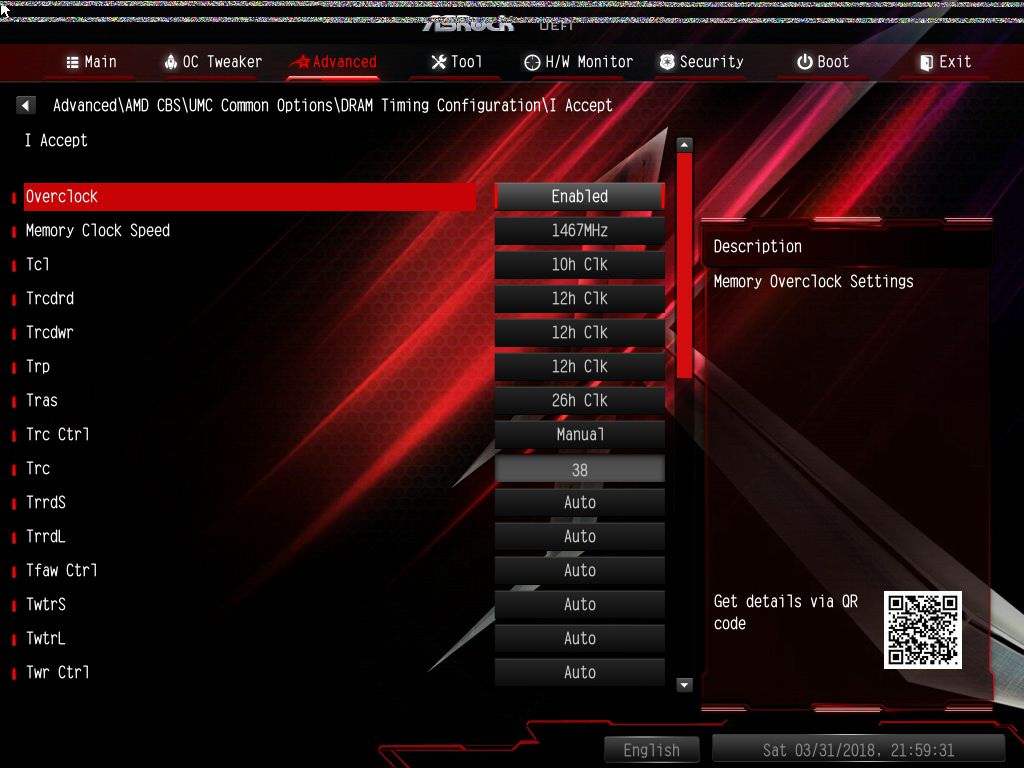
The setting that seemed to have a large influence on whether or not the system would even boot was ProcODT. Setting this to a magic number of 53.3 ohm seems to let the system boot. Values of 60 ohm or 40 ohm, and the memory timings just wouldn’t stick.
In learning about memory testing utilities I learned that it is possible to install Ubuntu Linux on Windows 10. This is great as it allows access to a whole load of command line utilities on Linux that simply are not available on Windows. For memory testing, it allows the use of the stressapptest utility which is apparently used by Google to stress test the memory stability of their servers. To run it just open the Linux terminal and run the following command to stress test for an hour.
stressapptest -W -s 3600