Java has been around for over two decades at the time of writing. I’ve been through its ups and downs as I’ve maintained my own little library of engineering software. With each change or upgrade, it was inevitable that something would break and as I added more libraries into the mix, the potential for more to break just increased. Usually the fixes were not too dramatic but occasionally something rears its head and demands to be fixed.
On this occasion I had recently updated to the new open-source Adoptium JDK 17 alongside NetBeans 12.6. Note that these are just changes to the Java Development Kit (JDK) and integrated development environment (IDE). There were no changes to the actual Pyrus software at this time. Within the Pyrus application I am running OpenGL via the JogAmp 2.3.2 release. Not content with with just updating the JDK and IDE, I had upgraded to a larger 42” 4K monitor. The extra screen real estate is welcome but at native resolution the icons and text are simply too small so I had engaged Windows display feature to change the scale it renders everything by 125% which is also referred to as high dots per inch (DPI) scaling.
How Hard Can it Be?
The problems started when I was trying to launch a 3D seismic viewing window which had been working just fine (thank you very much) for a while. The window simply failed to launch. A look into the stack trace shows that wonderfully named class WindowsAWTWGLGraphicsConfigurationFactory was throwing an array index out of bounds exception as it was trying to determine an appropriate GraphicsConfiguration that describes the capabilities of the host system display device.
The original code taken from this class is as follows:
final int gcIdx = pfdIDOSet.indexOf(Integer.valueOf(winConfig.getPixelFormatID()));
if (0 > gcIdx) {
	chosenGC = configs[gcIdx];
	if(DEBUG) {
		System.err.println("WindowsAWTWGLGraphicsConfigurationFactory: Found matching AWT PFD ID "
				+ winConfig.getPixelFormatID() + " -> " + winConfig);
	}
}
Note the if (0 > gcIdx). This pretty much guarantees that the code block will only be executed if the array index is negative and will be skipped over if the array index is zero or positive. This is precisely the opposite behaviour to what is required and perhaps unsurprisingly it was a recognised bug in JogAmp which has since been fixed. However, at the time of writing, the latest version of JogAmp is still 2.3.2 so there is no fixed version available. This meant I had to fix the issue manually, and thanks to open source software I was able to do that. To do this required deleting WindowsAWTWGLGraphicsConfigurationFactory from the “jogl-all.jar” and making a new version located in the “jogamp.opengl.windows.wgl.awt” namespace folder source directory.
Debugging showed that gcIdx was being returned with the value -1 meaning the index for the Windows GraphicsConfiguration was not being found. This was strange because device.getConfigurations() had returned a configuration earlier in the class and the configs[] array contained that single configuration. The fix was to ensure that the chosen configuration is used if an index of zero or higher is found, and with a fallback that if the index cannot be found but the array is not empty, then the first configuration is used instead.
final int gcIdx = pfdIDOSet.indexOf(Integer.valueOf(winConfig.getPixelFormatID()));
if (gcIdx >= 0) { // fix bug so that if an index for the configuration is found then it is used
	chosenGC = configs[gcIdx];
	if(DEBUG) {
		System.err.println("WindowsAWTWGLGraphicsConfigurationFactory: Found matching AWT PFD ID "
				+ winConfig.getPixelFormatID() + " -> " + winConfig);
	}
} else if (configs.length >= 1) {
	chosenGC = configs[0]; // if gcIdx is negative but there is at least one configuration, then use it
}
Getting JogAmp to Size Correctly on a High DPI Display
At this point I was feeling pretty comfortable that the problems were solved. Little did I know that this was just the start of a very long night.
The next problem was immediately evident, even if the solution wasn’t obvious. Upon launching the OpenGL window used to display the seismic data, the OpenGL canvas component within the window was clearly too small as shown in Figure 1. What could be the issue be? There were no evident errors being thrown in the program log and the OpenGL canvas component would function correctly within the area that was rendered. It was simply the wrong size.
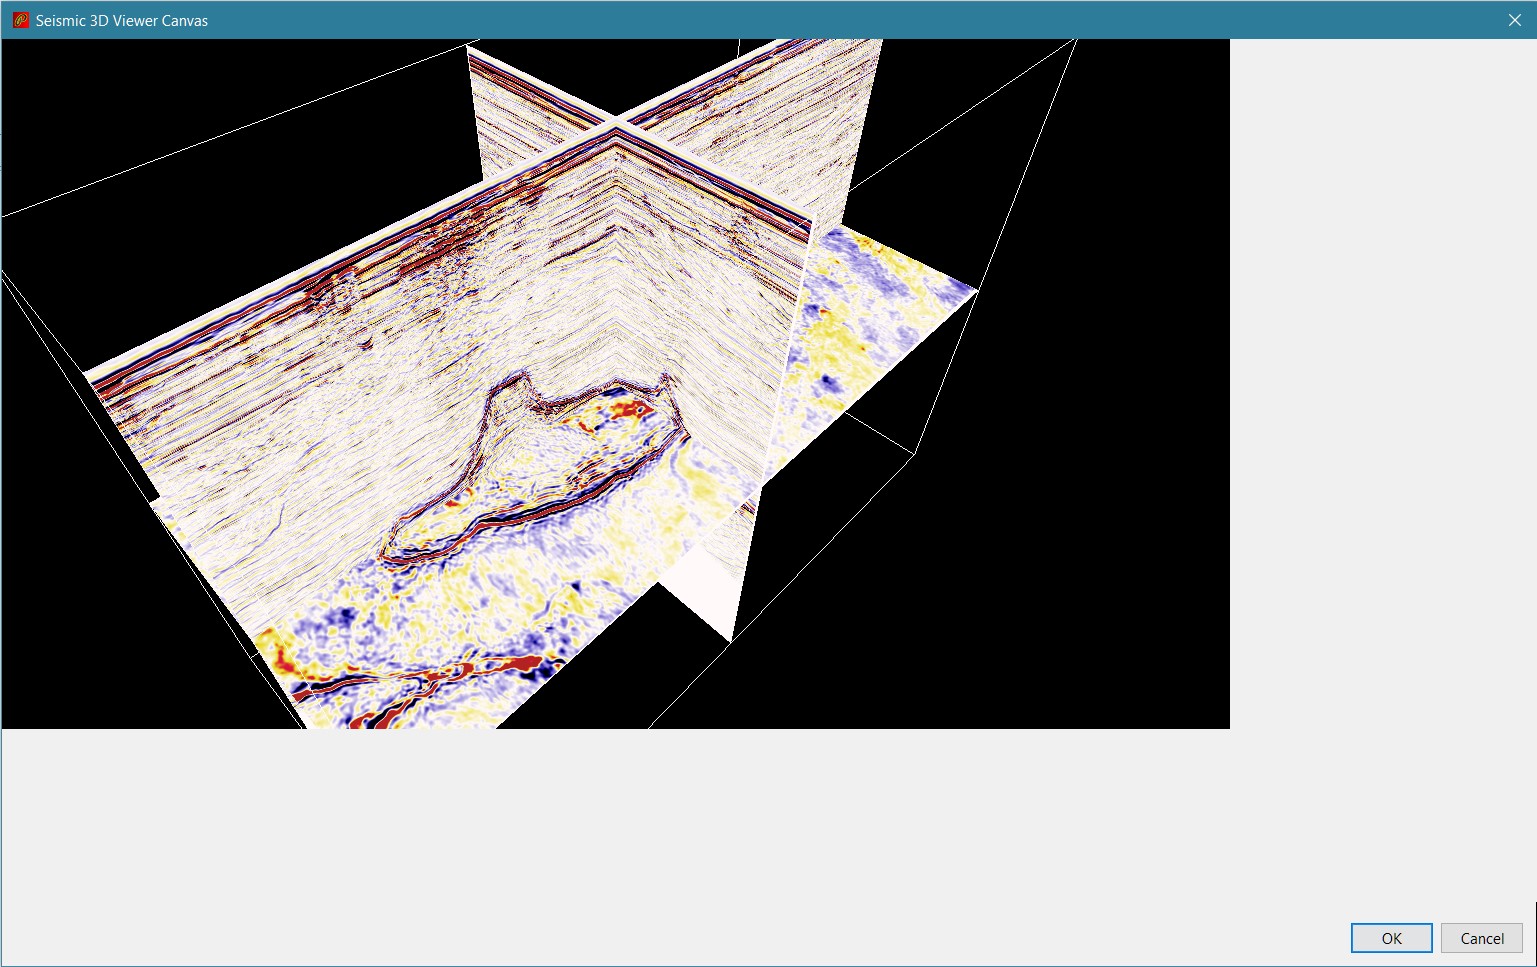
NewtCanvasAWT in Swing on High DPI monitor.After much wailing and gnashing of teeth, the problem was found to be linked to another JogAmp 2.3.2 incompatibility. This time the culprit was new high resolution displays which also implement scaling so that icons and text do not appear too small. So whilst the 4K monitor I’m using has a native physical resolution of 3840 × 2160 px, when querying the screen dimensions it would return a dimension of 3072 × 1728 px. Multiplying these values by 125% gives the correct native physical resolution.
What is happening is that under a High DPI environment a virtual scaled screen with a lower resolution is being rendered to. JogAmp renders directly to the monitor so its output is not being scaled by the operating system but the container holding the NewtCanvasAWT is scaled. The simple fix would be to access the scaling factor apparent in the host system, and then use these scaling factors to enlarge the canvas to fill the container.
This turned out to be more involved than it feels it should be. Apparently it is quite hard to get the scaling parameter from the host system. One library that does have this functionality is the JavaFX library. The functions double x_scaling = javafx.stage.Screen.getPrimary().getOutputScaleX() and double y_scaling = javafx.stage.Screen.getPrimary().getOutputScaleY() can be used to get the scaling. Then all that is needed is to subclass NewtCanvasAWT and override the getWidth() and getHeight() methods to return (int) (super.getWidth() * x_scaling) and (int) (super.getHeight() * y_scaling) respectively.
Getting JavaFX to Install in a NetBeans Module and Initialise
I’ll admit that I’ve never really felt the need to use JavaFX. Sure you can make ‘prettier’ looking GUI, but when the emphasis for Pyrus has always been on the data and custom widgets for display of data such as seismic and well logs, the look and feel for buttons etc. wasn’t near the top of the list of priorities.
However, the day had finally arrived to install this. Once upon a time JavaFX was bundled as part of the JDK but Oracle took the decision to remove it from JDK 11 onwards. As with many external libraries that I use, the approach used is to wrap the library jars in a NetBeans module so that the library can be exposed only to those other modules that require it. Adding the jars and exposing the classes to other modules allows the application to compile. Unfortunately runtime errors are then encountered. The issues encountered here were using JavaFX version 17.0.2.
It turns out that there were two further issues that needed to be resolved. The first of which was trivial and the second was more involved.
- JavaFX has a bunch of native libraries that also need to be made accessible to the application in addition to the jars. In NetBeans the correct approach is to navigate to the “/release/modules/bin/” folder of the NetBeans Module containing the JavaFX jars, and add all the native libraries. Since this folder does not exist it is likely you will need to create it.
- Even after adding the native libraries errors are still thrown, this time in relation to failing to initialise the JavaFX toolkit. It appears that JavaFX expects to be part of a program that extends the
Applicationclass, and that when theApplicationis instantiated, it will set up the JavaFX environment and toolkit. So how to handle the case where we are using JavaFX with the NetBeans rich client platform? The solution found was to create a simple no-op class that extendsApplication. This can be launched on a thread called from anInstallerclass that extends theorg.openide.modules.ModuleInstallclass. By adding the lineOpenIDE-Module-Install: javafx/Installer.classto the module manifest, thisInstallerclass is loaded and run when the module is installed by the NetBeans RCP at start-up. Therefore any modules that depend on JavaFX don’t have to worry about initialising JavaFX because this has already been taken care of when the JavaFX module was loaded.
Our Installer class launches a very simple FXStarter class on a thread.
package javafx;

import javafx.application.Application;
import org.openide.modules.ModuleInstall;

/**
 * Initialise components when module is installed. This module ensures that JavaFX capabilities are available to modules
 * that rely on JavaFX.
 */
public class Installer extends ModuleInstall {

    @Override
    public void restored() {
        initFx();
    }

    private synchronized static void initFx() {

        // Start up the JavaFX platform
        new Thread(() -> Application.launch(FXStarter.class)).start();
    }
}
Because the FXStarter class could take some time to finish instantiating (after which JavaFX is available), we include a CountDownLatch that blocks until the JavaFX has completed its initialisation. This allows us to defensively check against the availability of JavaFX using FXStarter.awaitFXToolkit().
package javafx;

import java.util.concurrent.CountDownLatch;
import javafx.application.Application;
import javafx.stage.Stage;

/**
 * Stub for starting the FX toolkit with latch to check that toolkit is actually available before making any calls to
 * use it.
 */
public class FXStarter extends Application {

    private static final CountDownLatch latch = new CountDownLatch(1);

    public static void awaitFXToolkit() throws InterruptedException {
       latch.await();
    }

    @Override
    public void init() {
        latch.countDown();
    }

    @Override
    public void start(Stage primary_stage) {
        // no-op
    }
}
Once the JavaFX module has been properly configured within NetBeans, it is possible to finally run JOGL using the scaling parameter for High DPI monitors which is revealed to the application. The NewtCanvasAWT is now scaled to the correct dimensions of the Swing frame as shown in Figure 2.
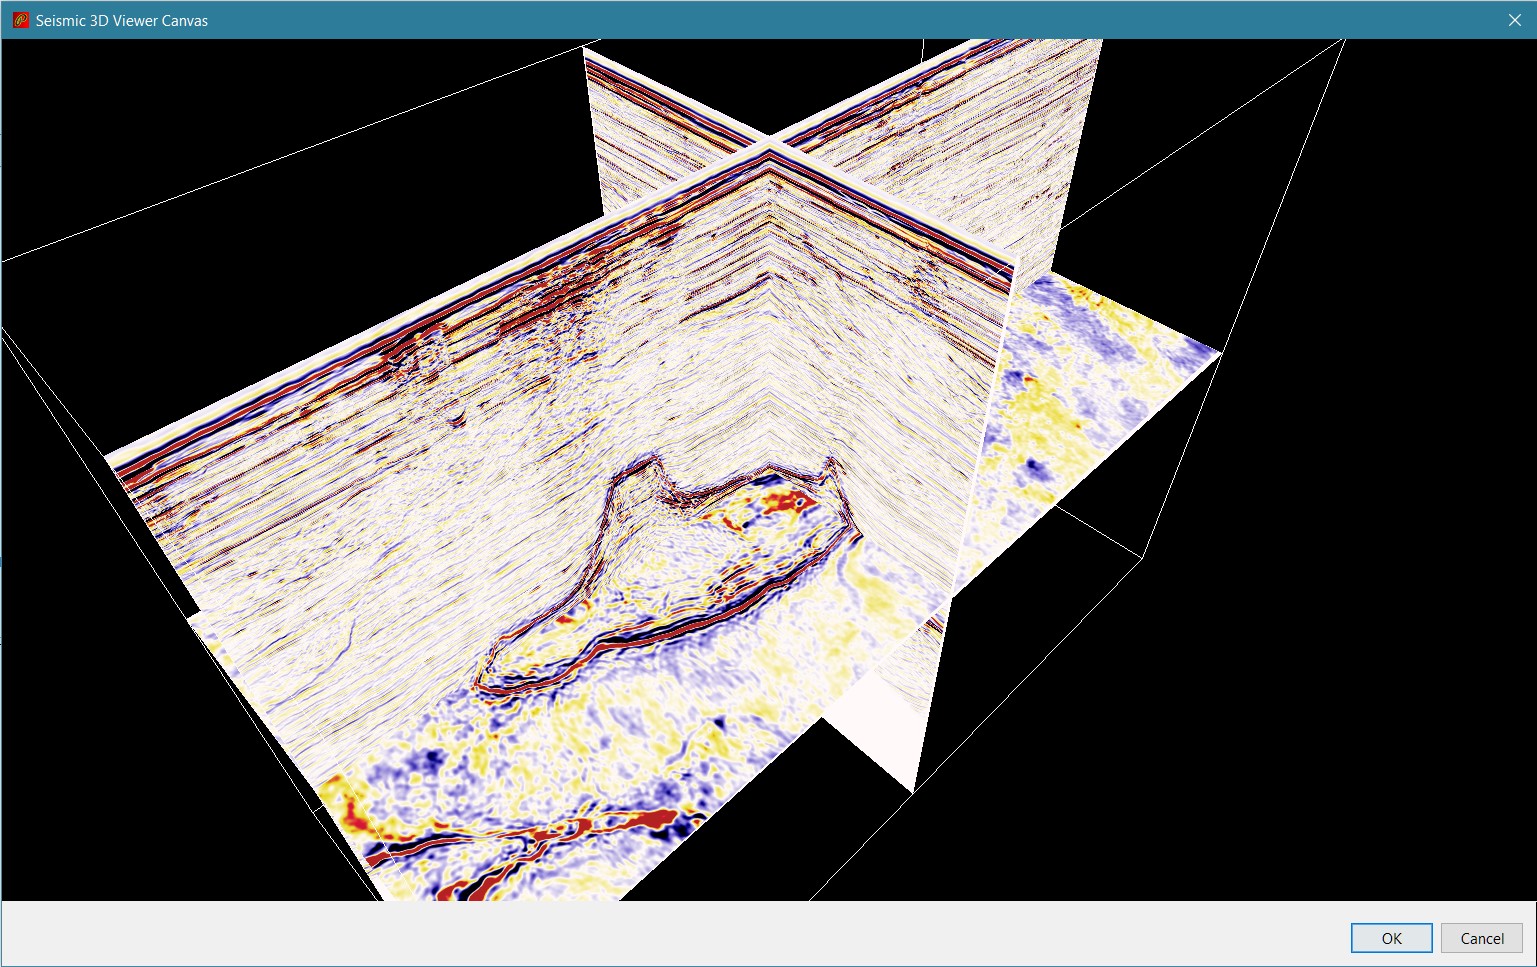
NewtCanvasAWT in Swing on High DPI monitor.What is With All the Errors?
We’re almost there now. The only problem remaining is that the application log has a number of errors that are showing up due to changes in the JDK which affected how some tools and libraries are able to access parts of the JDK that are meant for internal use only. The problem is that some of these internal classes are actually quite useful, and if it is a library that is causing the problem with the updated JDK and there is no update to that library, there is a problem of how to resolve the issue.
With JogAmp it was again known that there are some issues with JOGL and newer JDKs. The workaround recommended is to add JVM runtime parameters that ensure parts of the JDK are accessible to unnamed modules.
--add-exports java.base/java.lang=ALL-UNNAMED
--add-exports java.desktop/sun.awt=ALL-UNNAMED
--add-exports java.desktop/sun.java2d=ALL-UNNAMED
Interestingly the problems had been resolved on JDK 11 but had re-appeared on JDK 17. Rather than run on an older JDK it was a better approach to see if the JVM runtime parameters could be used to solve the problems with JDK 17.
To add the JVM parameters, it should be possible to add these to a module manifest via the line Add-Exports: java.base/java.lang java.desktop/sun.awt java.desktop/sun.java2d. However it doesn’t work. What is needed is to pass the JVM options at application launch. How to achieve this using NetBeans RCP?
The answer lies with the “platform.properties” file of the main application. Add the option run.args.extra to pass JVM options:
run.args.extra=\
    -J--add-exports=java.base/java.lang=ALL-UNNAMED \
    -J--add-exports=java.desktop/sun.awt=ALL-UNNAMED \
    -J--add-exports=java.desktop/sun.java2d=ALL-UNNAMED
Note that line continuation is indicated by the \ character in the “platform.properties” file and that JVM options must be preceded with ‘-J’. Adding these parameters to the JVM runtime eliminates the errors that were encountered with JogAmp 2.3.2.
Nearly There… Felix? What is Going On?
“Et tu Brute?” So far all the problems have been associated with JogAmp, JavaFX and JDK 17. NetBeans has been largely innocent and has provided a framework within which the solutions could be implemented. But with JDK 17 and NetBeans 12.6 there are still a couple of errors being logged on startup. These appear to be connected with the Felix 7.0.0 library which is used for the OGSi module implementation and is included with NetBeans 12.6.
The problems are apparently fixed with Felix 7.0.3. The solution was fairly hacky and involved downloading the latest version of Felix. The downloaded “felix.jar” was renamed to “org.apache.felix.main-7.0.0.jar” and the version in “C:\Program Files\NetBeans-12.6\netbeans\platform\modules\ext” was overwritten with this new version. Yes, the new version is 7.0.3, but using that version number in the filename leads to problems when running the application within NetBeans. Better to just leave the filename unchanged and trick NetBeans into thinking it’s the older 7.0.0 version.
So with all that we have managed to get our JOGL panel working in the latest version of NetBeans and JDK as of early 2022. It’s frustrating that such a huge effort was needed just to get functionality working again which was previously not broken. In the long run it should be worth it now that everything is up to date and almost looking shiny and new.