In the Pyrus Suite I have included equations of state from both the open-source CoolProp library and my own implementation for a cubic equation of state (EOS) that can be adjusted to use many different varieties, including the Enhanced Predictive Peng-Robinson EPPR78 EOS. A paper covering CoolProp has been published in the Journal Industrial & Engineering Chemistry Research with an OpenAccess license.The main driver for including the CoolProp library has been to get an accurate equation of state for pure carbon dioxide that can then be applied to carbon dioxide capture and sequestration simulation studies. Once incorporated into Pyrus, this presents an opportunity to compare the results from my own implementation of the EPPR78 equation of state (and other cubics) against the Helmholtz excess energy approach for mixtures, and the traditional cubic Soave-Redlich-Kwong and Peng-Robinson equations of state, all of which are included with CoolProp.
CoolProp is an interesting piece of software. Written in C/C++, in itself it is a library rather than a complete front end graphical user interface. The emphasis is on the accuracy and functionality of the calculations performed rather than presenting a fancy front end. It has a large number of wrappers for other languages which means the library can be incorporated into a wide range of other software. With the Excel add-in and Python wrapper, it allows easy and rapid prototyping to help understand the behaviour of different fluids. Despite the excellent documentation, there were still a few snags along the way that I encountered in getting CoolProp to work within a NetBeans rich client platform application. Some pointers to help others trying to install in this environment are given here.
CoolProp HEOS Versus Pyrus Implementation of PPR78 Equation of State
Let’s jump to the end leaving the technical details for later. How does CoolProp compare to the cubic equation of state tools that I’ve been writing for Pyrus? The quick answer is that they are complementary and have different strengths. CoolProp is particularly good for single pure or pseudo-pure fluids. The EOS in Pyrus had not been written to cope with single component mixtures, so being able to leverage CoolProp in the event that a pure fluid is needed (such as pure methane or carbon dioxide) is very useful. On the other hand, mixtures are openly recognised by the CoolProp lead developer and creator as a weak point of the library. In Pyrus, implementing the best possible solution for hydrocarbon mixtures is the primary objective.
The definition of ‘best’ is somewhat subjective, but generally improvements to the three axes of accuracy, robustness and speed represent positive outcomes. Accuracy is measured against how well the EOS is able to replicate laboratory measured results for known mixtures. Robustness measures how well the EOS is able to cope with a wide range of different mixture compositions across a range of temperatures, pressures and different fluid property predictions. Finally speed is simply how quickly the EOS is capable of delivering a result. In some ways this is another trilemma – we want all three, but you get to pick two. There are trade-offs to consider. If the algorithm is fast and accurate, then it is probably quite specialised and narrow in application and won’t be able to cope with generalised situations. On the other hand, if it is fast and can cope with a wide range of different compositions and conditions, then it is likely to sacrifice some accuracy. Finally, if you want it both accurate and robust, then it is probably going to be slow as the algorithm is going to be complex in order to deliver on both those axes.
To compare CoolProp against Pyrus, I’ve picked two mixtures with published compositions that can be used to crudely compare the results. These mixtures are both taken from Generalized Phase Boundary Determination Algorithm for Multicomponent Mixtures (Ortiz-Vega, Cristancho and Hall, 2011). They consist of a hydrocarbon-only mixture and a hydrocarbon mixture plus nitrogen and carbon dioxide inerts. The mixtures comprise pure components only, and there is no pseudo-pure fluid for a C7+ fraction or similar.
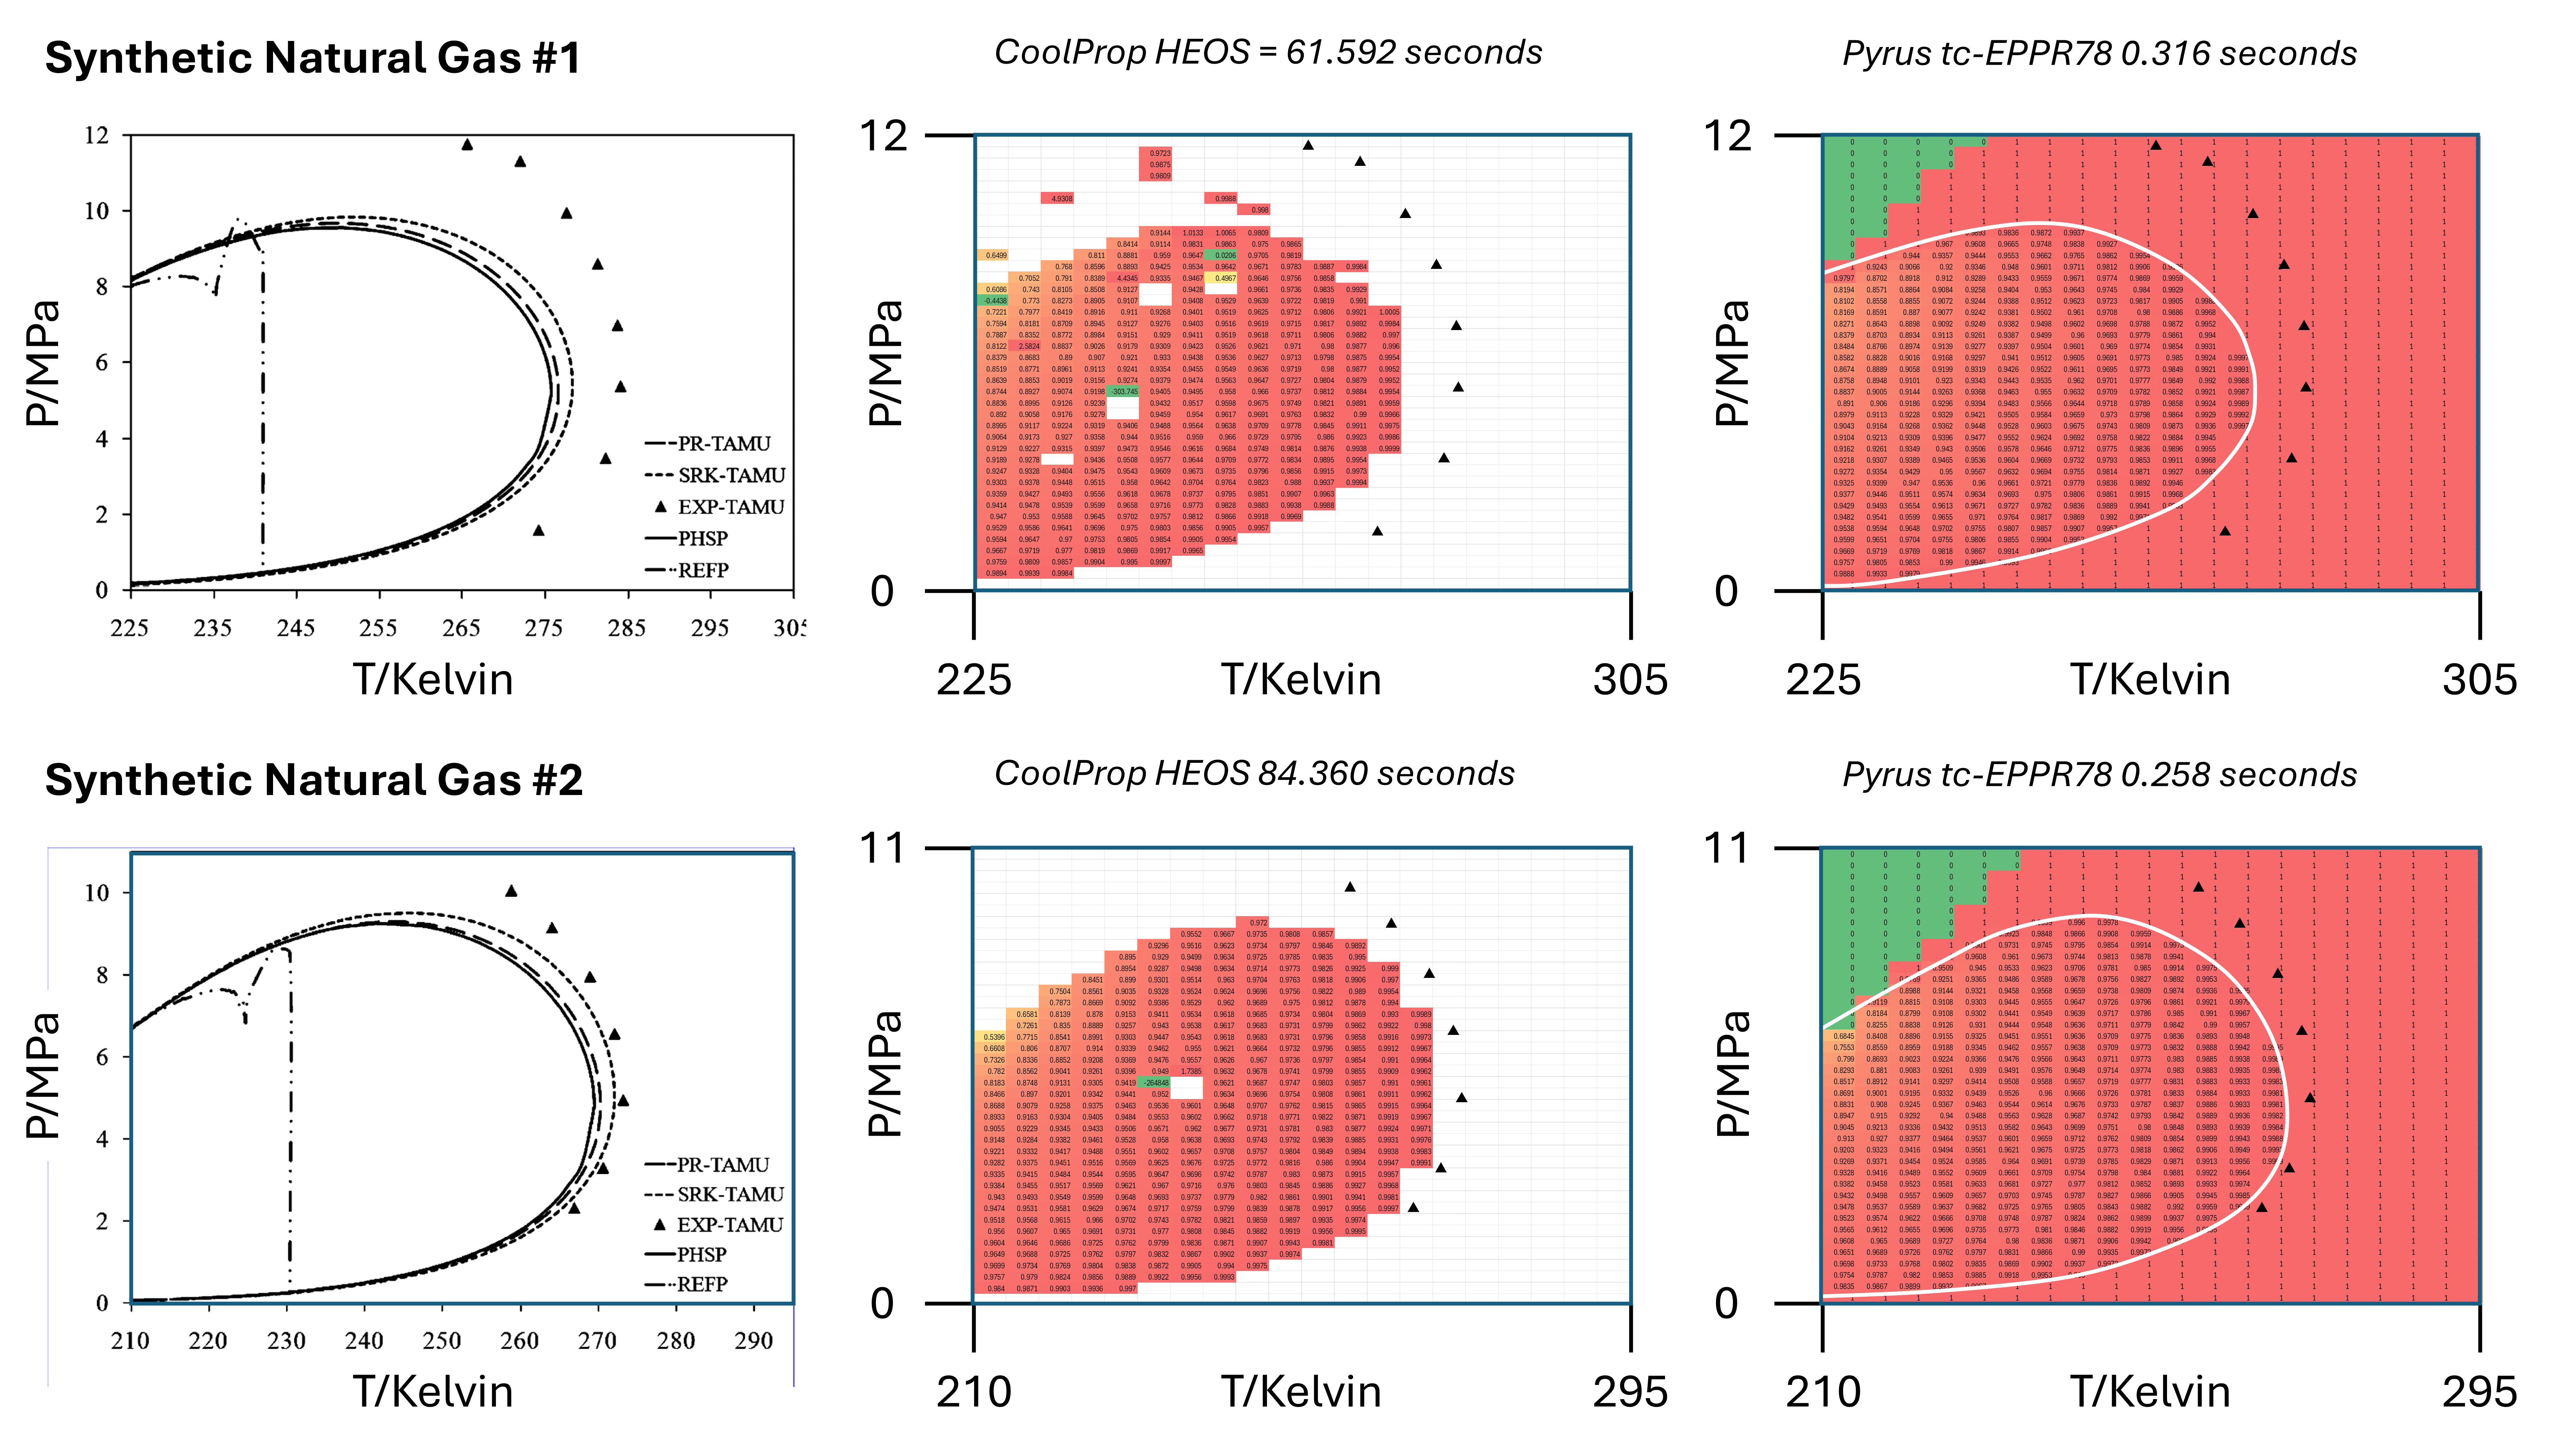
The figures above take the phase envelopes and experimental points from the paper and show a heatmap of the vapour fraction calculated using CoolProp’s HEOS method and Pyrus’ tc-EPPR78 implementation. The heatmap calculates the flash vapour fraction across a grid of points within the boundaries of the scales shown (which are the same as those in the published charts). Red indicates vapour = 100% and green is 0%. A white, or no colour, indicates that the flash calculation did not return a value e.g., an exception occurred or in the case of CoolProp, the answer lies outside the two-phase region. For the Pyrus results a phase envelope has been crudely drawn superimposed on top of the values to aid with visualisation of the boundary. The experimental results from the published paper are also superimposed on the CoolProp and Pyrus results.
It is observed that the published, HEOS and tc-EPPR78 methods all produce similar envelope boundaries, none of which are are expansive as the experimental results obtained. The tc-EPPR78 implementation appears to be both faster (by two orders of magnitude) and more robust in comparison to the CoolProp HEOS method. However, the HEOS method appears to give more accurate results close to the bubble point line in the vicinity of the critical point. Thus the theoretical trilemma discussed above appear to have some validity.
As implemented, CoolProp is used in the Pyrus suite to provide results for single component mixtures e.g., pure or pseudo-pure fluids, and the cubic EoS is used to provide results for multi-component mixtures.
Getting CoolProp to Work Within a NetBeans Platform RCP Application
The historical pre-built binary releases for CoolProp included pre-compiled wrappers for Java and native libraries for Windows, Linux and MacOS. At some point these builds were no longer included for the most recent releases meaning that the only options available for those wanting to use CoolProp in their own Java applications were to either (1) use an older version or (2) build the wrappers and native libraries themselves. To be fair the older versions of CoolProp still work, and whilst they may not incorporate all the latest improvements to the codebase, this may still be adequate for many purposes. Unfortunately, it is not possible to use these older versions in the NetBeans RCP module system for the simple reason that they were compiled using the default package, but to include the library in its own module, it is necessary to define a package e.g., ‘org.coolprop’. This meant that I had to build CoolProp first, before it could be incorporated into a NetBeans module.
Building CoolProp
Before we can get CoolProp integrated with NetBeans as a module, we need to get hold of a working version of CoolProp. This means compiling it from the source code. This is inevitably either straightforward, if the instructions work for you first time. On the other hand, it can be immensely frustrating if there is some inconsistency on your particular system and you are faced with a bewildering error message that doesn’t really tell you what the problem is.
-
Check that required prerequisites for compilation are installed. From my perspective, the hardest aspect of compiling was ensuring that all the pre-requisites needed by the build process were available on the system. Based on the Java philosophy of “write-once
debug-everywhererun-anywhere” it will be necessary to generate native executable libraries for at least Windows (64-bit), Linux and MacOS (universal binary). This will generally require access to each of these platforms to build the libraries from source. Cross-platform compilation is supposedly possible in theory, but in practice it’s just easier to use the target platform to compile. This means that the pre-requisites need to be installed on each of the three main target operating systems. The pre-requisites needed are:- CMake: Platform independent software to generate makefiles which are used for the build process.
- Git: Interfaces with the source code repository at https://github.com/CoolProp/CoolProp. This is needed even if you have cloned the respository using a different tool.
- 7-zip: Command line utility for compression of files into an archive.
- Python: To generate the header files and convert them to a binary file.
- C++ compiler: Compiles the source code into a native binary library whose methods can then be accessed by the Java Native Iterface.
- SWIG: This isn’t mentioned as a pre-requisite on the CoolProp website, but it is needed to generate the wrappers.
Note that these instructions presume that a Java Development Kit is already installed on the system being used to build CoolProp; logically why would you be compiling the Java wrappers for CoolProp if you weren't already developing for Java? That said, when I was compiling these native libraries I had to ask a colleague to use his Macbook Air to compile the MacOS native library for me. This meant I had to get the JDK installed on his system. At the time of writing, the simplest way I've found to achieve this is to use the [Azul Zulu builds of OpenJDK](https://www.azul.com/downloads/) which conveniently provide installers for a range of operating systems and architectures in one place. You should be able to confirm that Java is installed by running `java --version` from the command line.Windows
The CoolProp website explains the prerequisites that must be installed for Windows. Installing CMake, Git and 7-Zip are straightforward as there are installers available which simplify the process. From a Command Prompt or PowerShell terminal, the installation can be checked usingcmake --version,git --versionand7z.The command line version of Python is also installed via an installer using Miniconda, For Conda it will be necessary to install the
pipandsixpackages usingconda install pip sixfrom a Command Prompt or PowerShell terminal. The list of installed packages can then be checked usingconda listand the installed version can be checked withconda --version. If you have multiple Python environments installed, it may be necessary to set the correct choice of environment that is used. In VS Code this can be set with CTRL + SHIFT + P and choosingPython: Select Interpreter.For the C++ compiler I tested out both the MinGW and Microsoft Visual Studio options. I ended up using the C++ compiler included with the latest Visual Studio Community Edition as this supports 64-bit extensions. If you are building Python wrappers it is apparently quite important to use the same Visual Studio version as that used to compile the Python version. This does not appear to be a constraint when generating Java wrappers, and I can confirm that I used the 2022 Community Edition and have not run into any problems (yet!).
To install SWIG download the latest ZIP https://swig.org/download.html and extract the contents to a directory. Note that this won’t use an installation program, so you won’t be able to place it into ‘C:\Program Files’. I use the directory ‘C:\Tools’ on my system for zip distributable applications and tools like this. You’ll then need to add the folder location to your user path. Fastest way to do this is to open the Advanced System Properties control panel by using keyboard shortcut + R and running
sysdm.cpl. Then select the ‘Environment Variables…’ under the ‘Advanced’ tab. Select the Path variable in the user variables, and add the path to your SWIG installation e.g., ‘C:\Tools\swigwin-4.4.1’. To test whether it has been installed correctly, open a Command Prompt or PowerShell terminal and runswig -versionwhich should show what version of SWIG was found on the system.Linux
The CoolProp website explains the prerequisites that must be installed for Linux. A single command should suffice:sudo apt-get install cmake git p7zip g++ libpython3-dev swig. It may be necessary to additionally runpip install sixto install thesixpackage for Python. The installations can be checked usingcmake --version,git --version,7z,g++ --version,python3 --versionandswig -version.MacOS
The CoolProp website explains the prerequisites that must be installed for MacOS. Installation of Git, CMake, 7-Zip and SWIG is recommended via Homebrew. This requires the presence of the bourne again shell (bash) on the system, and if bash is available, then Homebrew can be installed with the one line command/bin/bash -c "$(curl -fsSL https://raw.githubusercontent.com/Homebrew/install/HEAD/install.sh)". Once Homebrew is installed the commandbrew install cmake git p7zip swigshould install CMake, Git, 7-Zip and SWIG. A C++ compilerclangshould already be built into MacOS. From a Command Prompt or PowerShell terminal, these installations can be checked usingcmake --version,git --version,7z,swig -version, andclang --version.That leaves Python. Python can be installed using a Miniconda installer for MacOS. Just pick the correct architecture (Intel x86 or Apple M1). It will be necessary to install the
sixpackage for Python usingpip install six. The list of installed packages can then be checked usingconda listand the installed version can be checked withconda --version. -
Clone the CoolProp repository on GitHub to a local directory. I used GitHub Desktop on Windows and it should also be available for MacOS. From the command line you should be able to use:
git clone https://github.com/CoolProp/CoolProp --recursive
This should make a new folder ‘CoolProp’ in the directory from which the command was run.
-
Make a build subfolder in the ‘CoolProp’ directory using your file explorer of choice. I’ve managed to build from the same files on Windows and Linux using Windows Subsystem for Linux, so I made two folders: ‘build-win’ and ‘build-linux’. For MacOS you could make a directory ‘build-macos’ instead. Alternatively you can do this from the command line.
cd CoolProp
mkdir build-linux
mkdir build-win
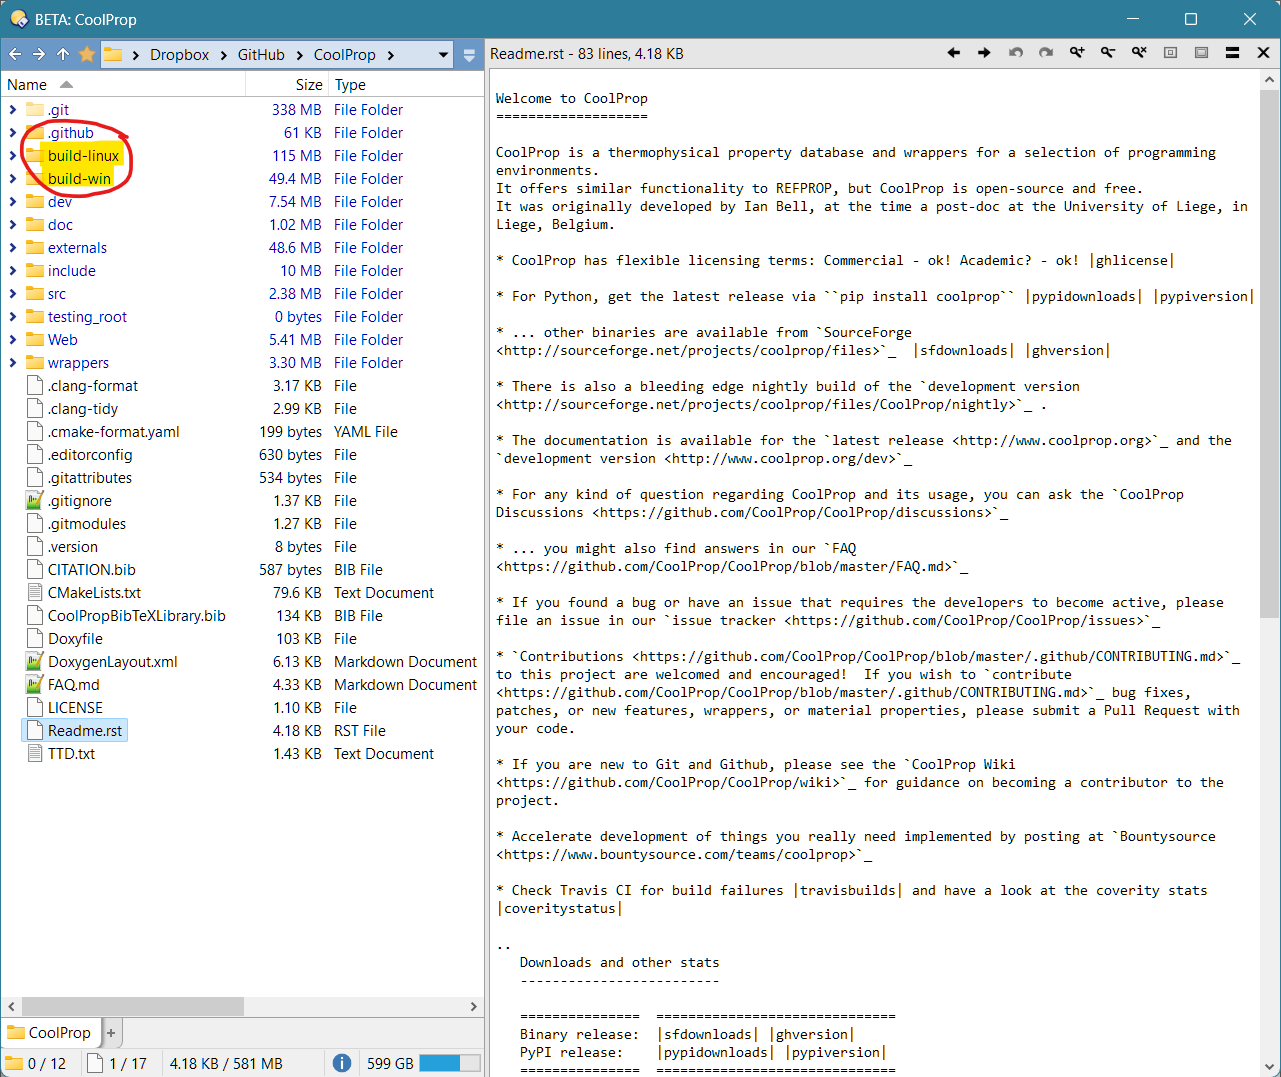
Figure 2: Folder structure after cloning respository from GitHub and creating two build directories for Windows and Linux. -
Build the source code to generate native libraries and Java source files that wrap the native libraries. These files can then be incorporated into a java application.
Compiling on any platform will generate the Java wrapper files and a native library for that platform. The Java wrapper files should be identical, irrespective of which platform was used for the compilation, so only one set of the Java wrapper files will be needed. The native library generated is unique for each platform, so three separate compilations will be needed to generate all three native libraries. Compiling follows the instructions on the CoolProp website, with the exception that we use a custom package “coolprop.org”. The option to use the package is very important as without this it is not possible to include Java files using the default package in NetBeans modules. Instructions for each platform are:
Windows
Open a Command Prompt or PowerShell terminal. Change to the ‘/CoolProp/build-win’ directory and run the following two commands.cmake .. -DCOOLPROP_JAVA_MODULE=ON -DBUILD_TESTING=ON -DCOOLPROP_SWIG_OPTIONS="-package org.coolprop" cmake --build . --config Release
Assuming the build runs without issues (keep your fingers crossed) the two generated items that you will need can be found at:
- The native library is located in the ‘’./build-win/Release directory’ as ‘CoolProp.dll’.
- The platform-independent Java wrappers using Java Native Interface are located in the ‘platform-independent.7z’ folder in the ‘’./build-win’ folder.
Linux and MacOS
Open a Terminal. Change to the appropriate ‘/CoolProp/build-linux’ or ‘/CoolProp/build-macos’ directory and run the following two commands.cmake .. -DCOOLPROP_JAVA_MODULE=ON -DBUILD_TESTING=ON -DCOOLPROP_SWIG_OPTIONS="-package org.coolprop" cmake --build .
Under WSL2 (Linux subsystem for Windows) this seems to take a long longer to compile using the GNU C compilers in comparison to the Microsoft Visual Studio C compilers on Windows. It gets there eventually. The generated files are slightly different:
- The native libraries is located in the ‘build-linux’ directory as ‘libCoolProp.so’ or the ‘build-macos’ directory as ‘libCoolProp.jnilib’.
- The platform-independent Java wrappers using Java Native Interface are located in the ‘platform-independent.7z’ folder in the ‘./build-linux’ or ‘./build-macos’ folder.
During the initial attempted builds for MacOS, an error was encountered: `jni.h:45:10: fatal error: 'jni_md.h' file not found`. This arises from the inability of the build script to find the machine-dependent java native interface libraries. The solution was to add the location of these libraries into the CoolProp build script; they were present for Windows and Linux but MacOS was missing. [A pull request was submitted to the CoolProp project to fix the issue](https://github.com/CoolProp/CoolProp/pull/2347) and has been incorporated into the master codebase, so this should not happen in the future.
Wrapping CoolProp into a NetBeans Module
Having compiled all the source code, it’s not a simple case of just adding a \*.jar library to your NetBeans project in order to gain access to the CoolProp functions. There are a few steps that need to be taken to include the CoolProp library in its own NetBeans module. Alternatively, the final module is also available for download if you don’t want to go through the steps yourself.
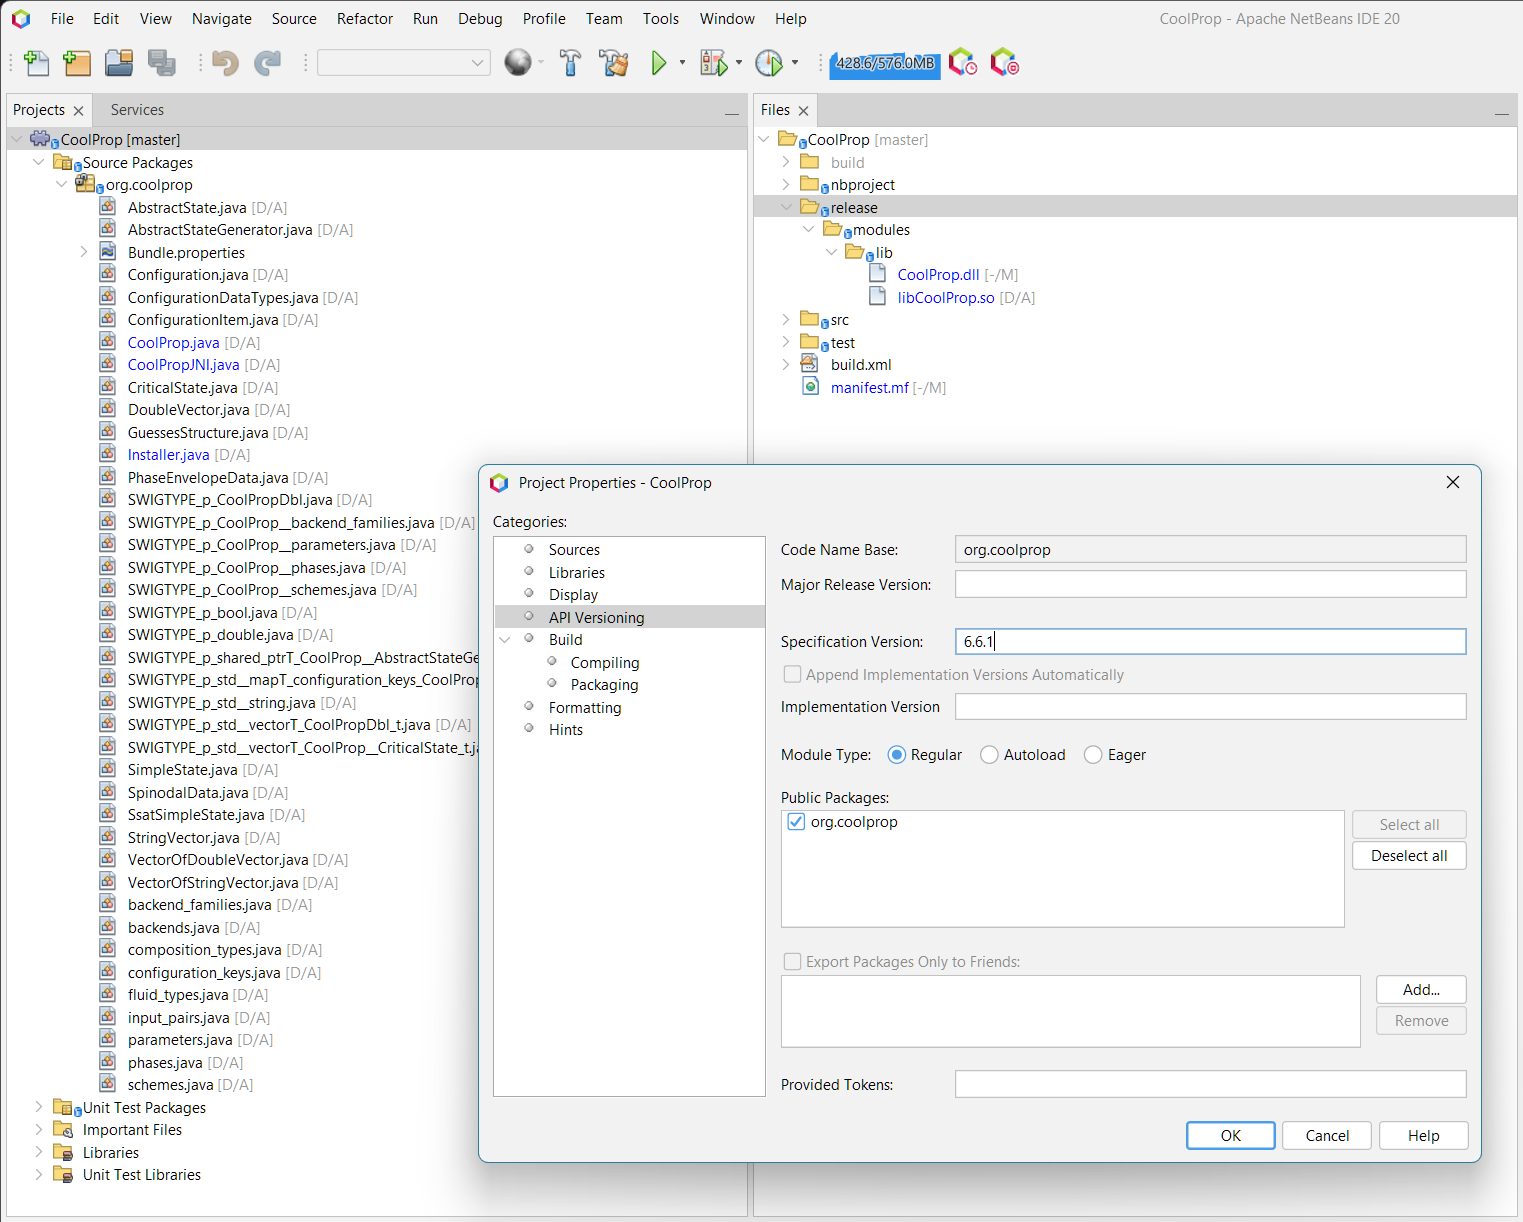
Module must be given the name CoolProp and the package base org.coolprop. This is because the native libraries and wrappers are compiled with the expectation that the package is org.coolprop. This is one reason why we had to compile our own collection of binaries for the module, because otherwise they are compiled with the default package and this will not work as a NetBeans module. The native libraries also use the name ‘CoolProp’ in their filenames, so it makes sense to use this for the module. We give the module a specification version that matches the version number of the CoolProp source that we compiled, which in the case of this example is 6.6.1. We must also ensure that the module exposes the org.coolprop package as a public package.
The native libraries should be placed in the module’s ‘./release/modules/lib/’ folder and all the Java files from the ‘platform-independent.7z’ file are unpacked into an ‘org.coolprop’ package folder within the source folders.
The location of the generated Java wrapper files and the native libraries is shown in Figure 2 below.
It is necessary to load the native libraries when the NetBeans RCP starts. This can be achieved by subclassing ModuleInstall and overriding the restored() method which is executed when the module is loaded. Unfortunately the code is a little more complex than just calling System.loadLibrary("CoolProp"); which we might get away with for a smaller Java program. This works fine for the deployed version of the module, but what if we are testing code using the CoolProp library. We would also like to be able to write unit tests and run small snippets of code that also use the CoolProp library. In this scenario the System::loadLibrary call will fail. What we must do instead is use System::load and pass an absolute path to the library location which is somewhat convoluted as it requires us to know the location of the module when it is being run (which will vary from installation to installation), and also to be aware of the operating system so that the correct native file is requested. This leads to the rather imposing looking code below that first attempts to divine the location of the class, gets the filepath from this and appends the ‘lib’ location, and finally then appends the appropriate native library name. If this approach fails, then it is because the application has been deployed and we can instead use System::loadLibrary as per usual.
package org.coolprop;

import java.io.File;
import java.net.URI;
import java.net.URISyntaxException;
import java.util.logging.Level;
import org.openide.modules.ModuleInstall;

public class Installer extends ModuleInstall {

    @Override
    public void restored() {
        setupLibraries();
    }

    public static void setupLibraries() {

        /*
         * Modified loading of native library to use absolute path based on class location so that files can be embedded
         * into NetBeans module for multiple operating systems. To use System.loadLibrary() we must place the native
         * files in a "release/modules/lib" folder as per Platform FAQ
         * https://netbeans.apache.org/wiki/main/wiki/DevFaqNativeLibraries/ For unit tests we instead use System.load()
         * using a system-dependent path to the same 'lib' subdirectory containing the native files.
         */
        try {

            // Get path of this class (will throw IllegalArgumentException if we are running from inside a jar)
            URI uri = Installer.class.getProtectionDomain().getCodeSource().getLocation().toURI();
            File f = new File(uri);

            // Append 'lib' subdirectory and library name in system independent format
            StringBuilder libpath = new StringBuilder(f.getParent());
            libpath.append(File.separator).append("lib").append(File.separator);

            // Load the native libraries using an absolute path for unit tests where the libraries are in classpath only
            for (String native_lib : NATIVE_LIBS) {
                LOG.log(Level.INFO, "System.load({0})", libpath.toString().concat(System.mapLibraryName(native_lib)));
                System.load(libpath.toString().concat(System.mapLibraryName(native_lib)));
            }
        } catch (IllegalArgumentException | UnsatisfiedLinkError | URISyntaxException e1) {

            // Load native libraries in "release/modules/lib" as per Platform FAQ
            for (String native_lib : NATIVE_LIBS) {
                LOG.log(Level.INFO, "System.loadLibrary({0})", System.mapLibraryName(native_lib));
                System.loadLibrary(native_lib);
            }
        }
    }

    /* == DECLARE CONSTANTS == */
    private static final String[] NATIVE_LIBS = new String[]{"CoolProp"};

    /* == ENABLE LOGGING == */
    transient private static final java.util.logging.Logger LOG =
            java.util.logging.Logger.getLogger(Installer.class.getName());
}
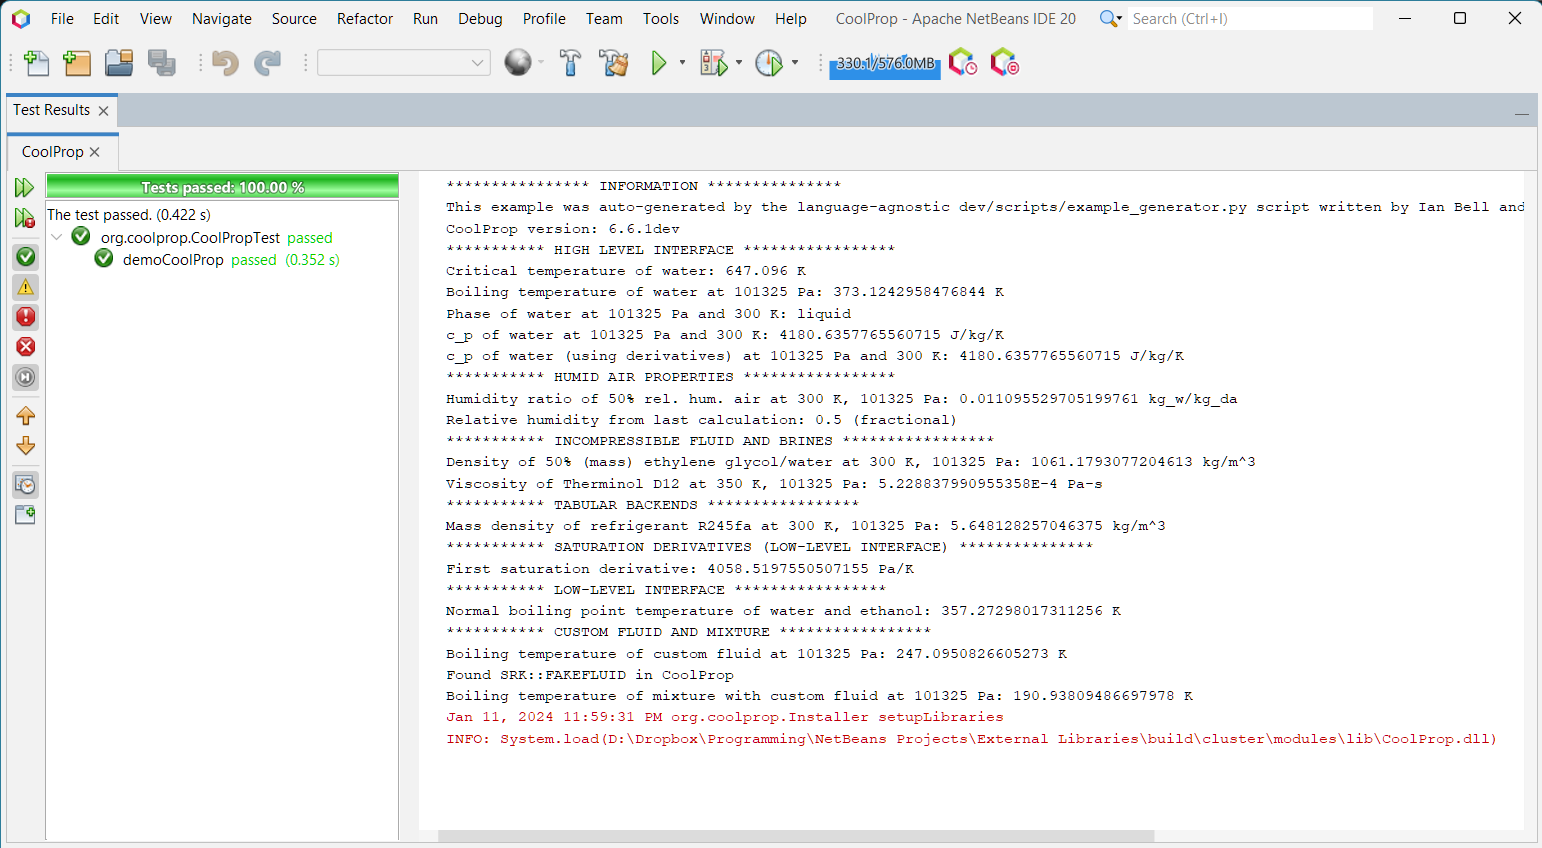
Testing the Module
Once the module is created we can test that the native libraries are correctly loaded and run. The unit test below is based on the examples included with CoolProp, but specifically also includes creation of a custom fluid and use of that fluid in a binary mixture. This test is not included in the standard example.
    /**
     * Test that the native library can be loaded and run some tests as per the demo calls.
     */
    @Test
    public void demoCoolProp() {
        System.out.println("**************** INFORMATION ***************");
        System.out.println("This example was auto-generated by the language-agnostic dev/scripts/example_generator.py "
                + "script written by Ian Bell and modified by Peter Kirkham to test specific aspects for Pyrus");
        System.out.println("CoolProp version:" + " " + CoolProp.get_global_param_string("version"));

        // See http://www.coolprop.org/coolprop/HighLevelAPI.html#table-of-string-inputs-to-propssi-function for a list
        // of inputs to high-level interface;
        System.out.println("*********** HIGH LEVEL INTERFACE *****************");
        final double water_tcrit = CoolProp.Props1SI("Water", "Tcrit");
        System.out.println("Critical temperature of water: " + water_tcrit + " K");
        assertEquals(647.096, water_tcrit, 1.0e-03);
        final double water_tb = CoolProp.PropsSI("T", "P", 101325, "Q", 0, "Water");
        System.out.println("Boiling temperature of water at 101325 Pa: " + water_tb + " K");
        assertEquals(373.124, water_tb, 1.0e-03);
        final String water_phase = CoolProp.PhaseSI("P", 101325, "T", 300, "Water");
        System.out.println("Phase of water at 101325 Pa and 300 K: " + water_phase);
        assertEquals("liquid", water_phase);
        final double water_cp = CoolProp.PropsSI("C", "P", 101325, "T", 300, "Water");
        System.out.println("c_p of water at 101325 Pa and 300 K: " + water_cp + " J/kg/K");
        assertEquals(4180.635, water_cp, 1.0e-03);
        final double water_cpderiv = CoolProp.PropsSI("d(H)/d(T)|P", "P", 101325, "T", 300, "Water");
        assertEquals(4180.635, water_cpderiv, 1.0e-03);
        System.out.println("c_p of water (using derivatives) at 101325 Pa and 300 K: " + water_cpderiv + " J/kg/K");
        System.out.println("*********** HUMID AIR PROPERTIES *****************");
        final double air_humidrat = CoolProp.HAPropsSI("W", "T", 300, "P", 101325, "R", 0.5);
        System.out.println("Humidity ratio of 50% rel. hum. air at 300 K, 101325 Pa: " + air_humidrat + " kg_w/kg_da");
        final double air_relhumid = CoolProp.HAPropsSI("R", "T", 300, "P", 101325, "W", air_humidrat);
        System.out.println("Relative humidity from last calculation: " + air_relhumid + " (fractional)");
        assertEquals(0.5, air_relhumid, 1.0e-12);
        System.out.println("*********** INCOMPRESSIBLE FLUID AND BRINES *****************");
        final double mix_dens = CoolProp.PropsSI("D", "T", 300, "P", 101325, "INCOMP::MEG-50%");
        System.out.println("Density of 50% (mass) ethylene glycol/water at 300 K, 101325 Pa: " + mix_dens + " kg/m^3");
        final double therminol_visc = CoolProp.PropsSI("V", "T", 350, "P", 101325, "INCOMP::TD12");
        System.out.println("Viscosity of Therminol D12 at 350 K, 101325 Pa:" + " " + therminol_visc + " " + "Pa-s");
        System.out.println("*********** TABULAR BACKENDS *****************");
        AbstractState TAB = AbstractState.factory("BICUBIC&HEOS", "R245fa");
        TAB.update(input_pairs.PT_INPUTS, 101325, 300);
        final double tab_massdens = TAB.rhomass();
        System.out.println("Mass density of refrigerant R245fa at 300 K, 101325 Pa: " + tab_massdens + " kg/m^3");
        System.out.println("*********** SATURATION DERIVATIVES (LOW-LEVEL INTERFACE) ***************");
        AbstractState AS_SAT = AbstractState.factory("HEOS", "R245fa");
        AS_SAT.update(input_pairs.PQ_INPUTS, 101325, 0);
        final double first_saturation_deriv = AS_SAT.first_saturation_deriv(parameters.iP, parameters.iT);
        System.out.println("First saturation derivative: " + first_saturation_deriv + " Pa/K");
        System.out.println("*********** LOW-LEVEL INTERFACE *****************");
        AbstractState AS = AbstractState.factory("HEOS", "Water&Ethanol");
        DoubleVector z = new DoubleVector(); z.add(0.5); z.add(0.5);
        AS.set_mole_fractions(z);
        AS.update(input_pairs.PQ_INPUTS, 101325, 1);
        final double as_t = AS.T();
        System.out.println("Normal boiling point temperature of water and ethanol:" + " " + as_t + " " + "K");
        System.out.println("*********** CUSTOM FLUID AND MIXTURE *****************");
        String fluidstring = "[\n  {\n    \"CAS\": \"000-0-00\",\n    \"Tc\": 400.0,\n    \"Tc_units\": \"K\",\n"
            + "    \"acentric\": 0.1,\n    \"aliases\": [\n    ],\n    \"molemass\": 0.04,\n"
            + "    \"molemass_units\": \"kg/mol\",\n    \"name\": \"FAKEFLUID\",\n    \"pc\": 4000000.0,\n"
            + "    \"pc_units\": \"Pa\"\n  }\n]";
        CoolProp.add_fluids_as_JSON("PR", fluidstring);
        String coolprop_name = "SRK::FAKEFLUID";
        final double custfluid_tb = CoolProp.PropsSI("T", "P", 101325, "Q", 0.0, coolprop_name);
        System.out.println("Boiling temperature of custom fluid at 101325 Pa: " + custfluid_tb + " K");
        boolean found_fakefluid = false;
        try {
            CoolProp.get_fluid_param_string(coolprop_name, "CAS");
            found_fakefluid = true;
        } catch (Exception ex) {
        }
        System.out.println(String.format("%s %s in CoolProp",
                (found_fakefluid ? "Found" : "Missing"),
                coolprop_name));
        String cas_ff = "000-0-00";
        String cas_c2 = CoolProp.get_fluid_param_string("Ethane", "CAS");
        CoolProp.set_config_bool(configuration_keys.OVERWRITE_BINARY_INTERACTION, true);
        CoolProp.apply_simple_mixing_rule(cas_ff, cas_c2, "Lorentz-Berthelot");
        CoolProp.set_config_bool(configuration_keys.OVERWRITE_BINARY_INTERACTION, false);
        final double custmix_tb = CoolProp.PropsSI("T", "P", 101325, "Q", 0.0,
                "HEOS::FAKEFLUID-SRK[0.3]&Ethane-SRK[0.7]");
        System.out.println("Boiling temperature of mixture with custom fluid at 101325 Pa: " + custmix_tb + " K");
    }
If everthing is working, you should get the following:
Fixing the Functionality of Mixtures
When I eventually got CoolProp installed into a NetBeans module and started testing it, I ran into a problem concerning Mixtures. Specifically, code that should work was not functional. It would work under Python, but not in Java. The problem area was the mixture part of the code. Interestingly this only affected languages where SWIG was used to wrap the C++ code, and looking back through the historical releases it could be seen that the method had been missing for years. I guess that made me the first person using the Java wrapper for CoolProp that had noticed and then also decided to do something about it.
The resolution to this problem resulted in my first ever pull request for an open-source project. In itself this was a new experience, with a difficulty level compounded by the fact that I hadn’t really ever written much software in C/C++ and had no experience with SWIG, let alone the Java Native Interface methodology.
With hindsight, I approached the problem the wrong way. My unfamiliarity with the codebase meant that I was intrigued as to how this worked. The problem was that a specific method that was needed for mixtures and this was simply not available in the generated Java wrappers. My first quick and dirty fix was to create a different method that simply called the underlying missing method, in other words a basic pass through functionality. This approach resulted in SWIG wrapping the new method and meant that the functionality was restored, albeit with the need to use a different method name to achieve the correct outcome. Whilst it worked, and for my personal use it was fine, it wasn’t good enough to submit back into the codebase because it required a new method name to be used. It was suggested that if a pass through could be made to work with the same method name, then that could potentially be considered. This was frustrating because for something so trivial, it was nearly impossible to find a way to get the code to compile. After several days of learning C++ I worked out a way to achieve this, but again had to modify other parts of the code to allow it to compile. All of which was not accepted as a pull request. And fair enough.
So I took a break for a few weeks. When I came back to the problem, I realised that I had been trying to trick the SWIG tool into wrapping the missing method. The question was, why was this method not being wrapped in the first place? There had to be a reason. This led to investigating how SWIG was supposed to work, and eventually I hit upon the answer and it was so simple. The problem was that the method in question was located in a different part of the codebase and even though C++ knew of its existence, SWIG wasn’t as sophisticated at working out its existence. This wasn’t an issue with SWIG or with CoolProp, both were working as designed. All that was needed was to add a single line into the SWIG configuration file to let it know about the location of the missing wrapped method and voila, it all worked.
So there you go… some functionality is missing from an open-source project for years, and after a determined month looking into the problem and trying several different approaches, the solution was simply to change just a handful of lines of code.