Language-aware text editing for Eclipse files has been implemented using the NetBeans platform and lies at the core of the Pyrus Suite initial release. The text editing support contains several standard features of an integrated development environment that is commonly used for other computer languages. These features are designed to improve the user-friendliness of text editors in general, speed up common laborious tasks, and reduce errors that can arise from what is essentially a loose format.
| Feature | Description |
|---|---|
| Editing Assistance | Pyrus uses the built-in text editing component provided by the NetBeans platform. This means it leverages and benefits from the editing assistance tools that are already incorporated into the editor. These include a range of keyboard shortcuts for common text editing tasks, bookmarks, macros and more. |
| Syntax Highlighting | The editor is syntactically aware of the format used for the Eclipse simulation deck. This allows the functional purpose of different text to be highlighted in a different colour, to help convey the meaning of the data better. Unlike simplistic syntax highlighting used in many generalised text editors, the syntax highlighting used can distinguish between similar looking tokens, such as the difference between keywords, array variable names, summary variable names and unquoted strings (all of which comprise up to eight capital letters). |
| Code Folding | Reservoir simulation decks containing many keywords can become quite large, particularly for arrays, tabulated or columnar data. The ability to collapse or expand keyword blocks to a single line is known as code folding. This can make it easier to scroll through large input decks by collapsing the lines shown down to just the keywords themselves. |
| Code Completion | When typing a partial keyword within a section, the editor can suggest possible keywords that match the starting letters already typed and complete the entire syntax for the keyword based using default or dummy values. When used in combination with the build-in language manual and the code formatting option, this makes it very quick to add a new keyword into a input deck. |
| Code Formatting | Given the free-form nature of a text file, and the lack of any required formatting standard according to the Eclipse language, the input deck can easily become inconsistent with regards to its formatting. Whilst this does not (or should not) affect the ability to run the deck using a simulator, it reduces readability of the input deck. By applying a standard format to column spacing, numerical and string formatting, and the addition of column headers and units within keywords, the efficiency of user interaction with an input deck is improved. |
| Keyword Navigation | Navigation within the document is aided by showing a listing of all the keywords contained within each section. Double clicking on a keyword will jump to that part of the document. This can reduce the time taken to locate a specific keyword or section within an input deck. |
| Error Highlighting | The Eclipse language expects a certain syntax for each keyword. Typographic errors in the input deck are typically not picked up until an attempt is made to run the simulation deck. Error highlighting is a feature that continuously checks the input deck for the expected syntax and highlights errors that are found, before the deck is run. The error highlighting is also aware of basic constraints on columnar inputs, so if for example a negative integer is found where only positive integers are allowed, this will be highlighted as an error. |
| Diff Versioning | Changes to an input deck are recorded locally and the option to wind-back to an earlier point in time is possible. Multiple versions of the same input file do not need to be saved. |
| Language Manual | Given the age of the Eclipse language (since the 1980s), there have been many developments and enhancements which has led to growth in the number of permissible keywords. The formats for these keywords are mostly consistent, but there are differences between them. Referring the the manual is often necessary, but it can be time consuming to find the information needed. With Pyrus the Eclipse language manual automatically syncs to the current caret location in the document. If you edit a keyword or type a new one, the manual (if shown) will automatically update to display the entry for that keyword. The manual implemented is based on the official OPM Flow manual. |
Editing Assistance
The Eclipse editor leverages the NetBeans platform to deliver a wide range of useful editing shortcuts for working with text documents. Some of these shortcuts are common to many different applications, and others are specific to the NetBeans platform. Common commands such as cut, copy, paste, undo, redo, find and replace use the same shortcuts that are typically found in other applications with similar functionality.
Less commonly encountered, but arguably more powerful shortcuts, are related to moving lines of text. Lines can easily be moved up or down, duplicated or removed using the shortcuts described below.
In the ECLIPSE language, a line comment starts with --. Rather than adding this to each line manually, if it is needed to comment out part of a simulation deck (typically when developing and testing the deck) then the shortcut CTRL + / can be used to toggle the commenting or uncommenting of all selected lines in one go.
All keyboard shortcuts can be viewed and edited using the Tools / Options / Keymap options dialog that can be accessed using the menu located at the top of the application window.
Bookmarks
Bookmarks can be toggled on and off in open documents using the CTRL + SHIFT + M keyboard shortcut or by right-clicking on the line number and selecting Bookmark / Toggle Bookmark. It is possible to jump between bookmarks using CTRL + SHIFT + . and CTRL + SHIFT + ,. To see all bookmarks in the IDE, select the menu Window / IDE Tools / Bookmarks.
Macros
Macros can be recorded using the record macro button in the editor window toolbar, or from the Edit / Start Macro Recording file menu. The macro records all the keystrokes that take place in addition to typing. A shortcut can be assigned to the macro once recording has stopped.
To see all recorded macros and edit their shortcuts, it is necessary to open Tools / Options / Editor / Macros dialog from the menu.
Arranging Windows
All windows in the IDE can be moved around to suit personal preferences. This is done simply by dragging and dropping the individual window tabs. A preview of where the new window will be placed is shown as a faint red outline. The functionality is fairly intuitive.
Rectangular Selection Mode
Usually when selecting between a starting and ending caret location in a text editor, the behaviour is to select all characters after the starting location to the very end of a line, and every line after that, up to the ending caret location. Effectively this is selecting sequential characters in the text file.
An alternative selection method that is more visual in nature, is to select a rectangular section of the document. This ignores the endings of lines. It is particularly useful to make multiple consistent edits to several lines at once, as if multiple lines are selected, the edits are applied to each and every line simultaneously.
Rectangular selection mode is toggled on and off using the CTRL + SHIFT + R keyboard shortcut.
Quick Reference
Keyboard shortcuts applicable to editing assistance:
| Shortcut | Action |
|---|---|
| CTRL + X | Cut selected text. |
| CTRL + C | Copy selected text. |
| CTRL + V | Paste the previously cut or copied text selection. |
| CTRL + SHIFT + UP-ARROW | Duplicate the selected lines above. |
| CTRL + SHIFT + DOWN-ARROW | Duplicate the selected lines below. |
| ALT + SHIFT + UP-ARROW | Move the selected lines up. |
| ALT + SHIFT + DOWN-ARROW | Move the selected lines down. |
| ALT + SHIFT + RIGHT-ARROW | Indent line by adding spaces. |
| ALT + SHIFT + LEFT-ARROW | Unindent line. |
| TAB | Indent line by adding spaces. |
| SHIFT + ENTER | Add blank line below current line. |
| CTRL + BACKSPACE | Delete word before cursor. |
| CTRL + DELETE | Delete word after cursor. |
| SHIFT + DELETE | Delete (remove) a line. |
| CTRL + E | Elide (remove) a line. |
| CTRL + F | Find matching text in document, optionally using regular expressions. |
| CTRL + H | Replace matching text in document, optionally using regular expressions. |
| CTRL + G | Goto a line number. |
| CTRL + SHIFT + R | Toggle rectangular selection mode. |
| CTRL + SHIFT + C | Toggle comment / uncomment selected lines. |
| CTRL + / | Toggle comment / uncomment selected lines. |
| CTRL + SHIFT + M | Toggle bookmark at current line. |
| CTRL + SHIFT + . | Move to next bookmark. |
| CTRL + SHIFT + , | Move to previous bookmark. |
| CTRL + Q | Jump to the last edited document location. |
| CTRL + Z | Undo previous action. |
| CTRL + Y | Redo last undone action. |
Syntax Highlighting
Syntax highlighting is a feature of text editors that is used for programming, scripting and markup languages, and is applicable to the Eclipse language used for simulation input decks. The feature displays text in different colours and fonts according to the category of terms. This feature facilitates writing in a structured language such as a programming language or a markup language as both structures and syntax errors are visually distinct.
The Eclipse language editor syntactically highlights the contents of an input deck that has been parsed (the file has been interpreted in accordance with the Eclipse language specification). This is a more robust approach in comparison to other text editors with generalised syntax highlighting that use pattern matching techniques with regular expressions.
Syntax highlighting can improve readability of the simulation deck by conveying syntactic meaning of the text along with the text digits themselves. The colouring does not change the meaning of the text, but serves to reinforce it. For example, in the Eclipse language, the use of up to eight capital letters is used for keywords, grid cell array variable names, summary variable names, string parameters and user-defined quantities. By colouring each of these types differently, it is possible to quickly distinguish between these types.
A list of types that are recognised in the Eclipse language and their default colours are as follows:
- Section keywords are medium violet red.
- Standard keywords are red.
- Arithmetic operations on grid cell array variables are bronze.
- Summary variables are olive drab.
- User-defined actions and quantities are teal.
- OPM Flow-specific keywords are red italic.
- Recognised but ignored keywords are grey italic.
- Unquoted string parameters use the colour scheme default.
- Single quoted string parameters use the colour scheme default.
- Numerical parameters use the colour scheme default.
- Mathematical operators use the colour scheme default.
- Comments use the colour scheme default.
Colour Schemes
Different colour schemes can be applied to take advantage of the recognised tokens. The default colour scheme is “NetBeans” which is applied out of the box when starting Pyrus for the first time. This is a light theme. The colours chosen for the syntax highlighting work equally well with dark themes, such as the “Norway Today” theme that is build into the NetBeans platform.
Changing the colour scheme or editing different aspects of the colour scheme is managed via the options menu. The Options dialog is accessed from the Tools menu located at the top of the application window. In the options dialog, it is necessary to select the Fonts & Colors panel. Changing to a different preset theme is possible via the “Profile:” setting, and individual changes to keyword colouring can be effected by setting the “Language:” dropdown choice to “Eclipse Simulation Deck” and editing the colour properties for the categories that are shown. To save your own preferred colour settings, it is easiest to duplicate one of the profiles that is closest to the colour scheme you would like, and then editing the individual categories to taste.
A comparison between light and dark themes can be seen below. The snippet of Eclipse language shown is chosen as it contains most of the different categories, and thus gives an idea as to how each different category will appear.

Various dark themes are also available in Pyrus. A scheme that works well with Pyrus (the colours are intentionally chosen to work well with this theme) is the “Norway Today” colour scheme. Pyrus has been designed to work well with the “Norway Today” theme, and it is recommended to select this as the colour scheme. However, personal preferences vary, and there is no right or wrong selection.
A notable difference between the light and dark themes is that the mathematical operators and the string / numerical parameters are treated differently. In the default “NetBeans” theme, these are both black. In the “Norway Today” theme, the operators are white and the parameters are yellow. Note that the trailing slashes in the Eclipse language are treated as mathematical operators, and thus it may be considered useful to colour these differently to parameters used in the data records following a keyword.
Quick Reference
Syntax highlighting is enabled automatically if an Eclipse language text file is detected. This is determined based on the filename extension. Since syntax highlighting is enabled automatically, there is no associated keyboard shortcut.
Code Folding
Code or text folding, or less commonly holophrasting, is a feature of some graphical user interfaces that allows the user to selectively hide (“fold”) or display (“unfold”) parts of a document. This allows the user to manage large amounts of text while viewing only those subsections that are currently of interest. It is typically used with documents which have a natural tree structure consisting of nested elements.
The Eclipse language editor recognises keyword blocks and allows those blocks to be collapsed to a single line and then re-expanded as necessary. A keyword block is defined as the first line on which a keyword is encountered, through to the last data record associated with that keyword. For most row vector, column vector, teble or multiple record style keywords, this will span from the first character of the keyword through to the very last terminating slash (‘/’) character.
Code folding is a useful feature for long keywords of tabular data. In these instances, unless there is a need to edit the data directly, collapsing the display of the keyword to single line greatly improves the overall readability of the simulation input deck. Note that it is rarely necessary to edit numeric data directly, unless there is an error that needs correcting, as these types of keywords are typically generated programatically using another program, such as the keyword generation tools within Pyrus itself.
Notable exceptions are:
- Comments: Two or more sequential comment lines that commence with ‘–’ sequence of characters are treated as a multi-line comment and can be collapsed as a single block.
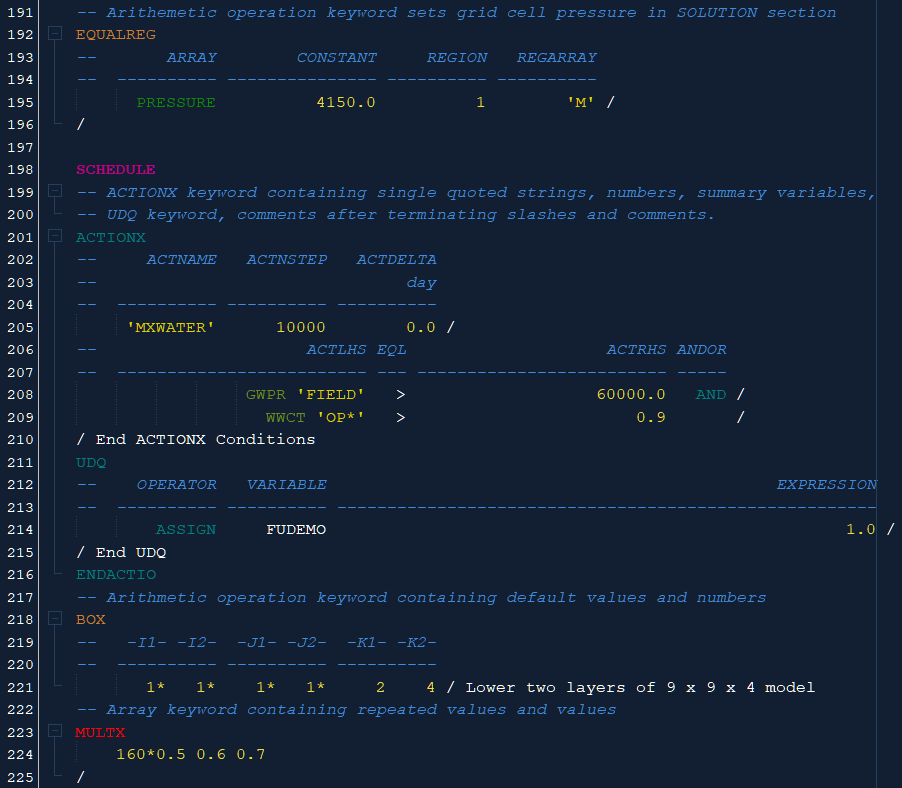
- ACTIONX: The ACTIONX keyword is a multiple record itself, which is then followed by a sequence of keywords and, finally, the ENDACTIO keyword to indicate the end of the keywords that are executed if the ACTIONX conditions are satisfied. The code block that is folded for the ACTIONX keyword extends from the keyword through to the closing ENDACTIO keyword. Note that if another ACTIONX command is nested within an outer ACTIONX, then it is the very final ENDACTIO keyword that is used to denote the conclusion of that ACTIONX code block.
- PYINPUT: The PYINPUT keyword indicates the start of an embedded Python language code block. The Python language input continues until a PYEND keyword is encountered. Therefore the code block that is folded for the PYINPUT keyword extends from the keyword through to the closing PYEND keyword.
- Summary variables: Sequential summary variables without blank lines to separate them are treated as a single block and can be collapsed.
Expanded and Collapsed States
The initial state for all keywords is to be expanded. The code folds are denoted by thin vertical lines to the left of the code, with a minus (‘-‘) character within a square box indicating that the code block can be collapsed.

Any code block can be collapsed (or ‘folded’) by clicking on the minus character in the square box at the top of the marked fold extent, or by using the keyboard shortcut is CTRL + MINUS. This collapses the keyword to a single line, and the number of collapsed (hidden) lines are shown in a collapsed fold summary box. Note that the text is not deleted, it is merely hidden for display purposes. Hovering over the collapsed fold summary box with the cursor will reveal the hidden text in a popup box without a need to expand the collapsed fold.

Note that after collapsing the code fold, the character in the square box changes to a plus (‘+’) character, which indicates that code block can be expanded back again. Clicking on the ‘+’ will expand the code back again.
Note that all code folds in the document can be collapsed at the same time by using the keyboard shortcut CTRL + SHIFT + MINUS. To expand all code folder in the document at the same time, the keyboard shortcut is CTRL + SHIFT + PLUS.
Quick Reference
Keyboard shortcuts applicable to code folding:
| Shortcut | Action |
|---|---|
| CTRL + MINUS | Collapse code block. |
| CTRL + PLUS | Expand code block. |
| CTRL + SHIFT + MINUS | Collapse all code blocks. |
| CTRL + SHIFT + PLUS | Expand all code blocks. |
Code Completion
Code completion is an autocompletion feature in many integrated development environments (IDEs) that speeds up the process of coding applications by fixing common mistakes and suggesting lines of code. The feature speeds up creation and maintenance of Eclipse language simulation input decks by reducing keyboard input and the necessity for keyword name memorization. It also allows for users to refer less frequently to external documentation, as interactive documentation appears dynamically in the form of a tooltip.
The Eclipse language editor recognises keywords as they are being typed and offers to automatically complete the keyword, including a boilerplate structure for any data records that may be associated with the keyword. The speeds up entry of keywords, particularly with regards to ensuring the format for the keyword is entered correctly.
Preview Autocomplete Options
At the start of a blank line, or after typing the initial characters of a keyword, it is possible to preview the allowable keywords that match what has been typed for the current section of the document. This is enabled by using the shortcut CTRL + SPACE. A dropdown appears near the cursor to show the available keywords that are considered valid for the section that is currently being edited. Note that only keywords currently supported by Pyrus are shown; this is effectively all keywords that are supported by the OPM Flow simulator.
A popup is also shown above or below the cursor and dropdown, containing the help description for the currently selected keyword in the dropdown. This aids identification of the correct keyword to be used.
Autocomplete Selected Keyword
To autocomplete a keyword from the dropdown menu, a variety of options are available. There are two keyboard keys that can be used: TAB, or ENTER. Alternatively a mouse double-click can be used to select the desired keyword. The autocomplete will finish not only the keyword itself (if partially typed) but will also add a single line data record that complies with the expected syntax for the keyword. Note that for multiple row vector keywords, or columnar vector keywords, further data row entries would need to be added manually.
The data used to populate the boilerplate data records generated are either the default values (if specified) for that keyword, or dummy values that correspond to the type of value expected. For example, if an integer is expected, the value “1” will be autofilled for that entry, whereas if a single quoted string is expected, the value “‘STRING’” will be autofilled for the entry. Although these are dummy values, they are the correct type of value, and should aid the user in applying an appropriate value.
NOTE: There is currently no capability for Pyrus to parse other keywords and use information from the simulation deck to populate autocompleted items with consistent data entries.
The autocompleted keyword is also pre-formatted to adhere to the Pyrus simulation input deck style. Whilst this is not required for the input deck to run correctly with the simulator, it improves readability of the deck.
Quick Reference
Keyboard shortcuts applicable to code completion:
| Shortcut | Action |
|---|---|
| CTRL + SPACE | Open keyword completion dropdown menu. |
| TAB | Autocomplete selected keyword in downdown menu. |
| ENTER | Autocomplete selected keyword in downdown menu. |
Code Formatting
Pretty-printing (or prettyprinting) is the application of any of various stylistic formatting conventions to text files, such as source code, markup, and similar kinds of content. These formatting conventions may entail adhering to an indentation style, using different color and typeface to highlight syntactic elements of source code, or adjusting size, to make the content easier for people to read, and understand. Pretty-printers for source code are sometimes called code formatters or beautifiers. Proper code formatting makes it easier to read and understand.
The Eclipse language is structured with respect to the sequence of keywords and data records that are expected. There is no strict requirement concerning the layout of the text within a file, and this leads to a large variety of styles (or the absence of them in many cases) that are used. The Eclipse editor includes tools that clean up the formatting of simulation decks, either for the whole file, or just for selection portions of the file. In addition, headings and column descriptions can be added to any keyword if needed. Since the Pyrus Suite includes a built-in language manual that synchronises to the caret position in any Eclipse document that is being edited, there is no compelling need to include this embedded information. However, if the deck is to be shared with others, then this may prove useful.
The formatting style implemented by Pyrus is designed to provide consistent layout and readability, rather than keeping the input text digits as compact as possible. The principles used in setting out the formatted keywords are:
- Keywords are left aligned the left page margin on their own line and should not be followed by any data records.
- Data records following a keyword are indented by four spaces.
- A right margin of 120 characters is applied for wrapping of long comments and certain data records. Note that row vector and columnar vector keywords are NOT wrapped; columns are allowed to extend beyond the 120 character right margin.
- Options and array data records are space delimited with a single space between records, and wrapped at a 120 character right margin.
- Row vector and columnar vector data records are organised into columns. Each column has a fixed width, with the data entry within the column being right aligned.
- Numerical values in a column are automatically formatted so that the numerical value will fit within the available column width. Note that this can cause a loss in precision if the unformatted value has many digits of precision. Generally, the default column widths for each keyword should be sufficient to express the necessary precision associated with data for each keyword. If additional precision is needed (as the column width is insufficient), it may be more appropriate to question whether that level of precision is warranted.
- Default column width for most row vector keywords is 10 characters. This is optimally sized for an eight character string limit wrapped in single quotation marks.
- Default column width for most columnar vector and tabular keywords with numerical data entries is 15 characters. This is generally sufficient for representation of floating point (32-bit) precision in scientific notation.
- Terminating slashes (‘/’ character) are placed at the end of a line with a preceding space if they are terminating a data record, or placed on their own line if they are terminating a keyword.
- Pair and triplet cell references are merged into a single column format. This is denoted by the column header which uses the ‘-‘ character to surround the heading of each sub-column. For example the columns “I1” and “I2” in a box definition are merged to for a single column “-I1- -I2-“. This is more compact and improves readability.
Formatting Keywords
Automatic formatting for an Eclipse input deck is conducted using the keyboard shortcut ALT + SHIFT + F or by right clicking in the editor and selecting the Format option from the context popup menu.
If a range of text is selected, then the formatting only applies to keywords that commence within the selected text range. Note that keywords that continue beyond the selected text range are still formatted and that keywords that are only partially selected are not formatted.
The formatted keyword automatically inserts column headings within the keyword block according to the required columns. These column headings are formatted as comments. Note that any comments within a keyword block (defined as the extent from the start of the keyword to the end of the very last data record or terminating slash) are discarded when reformatting the keyword. However, comments located outside of keyword blocks are preserved. Therefore, if it is necessary to keep a comment, it is important to move it outside of a keyword block to avoid losing the comment.
If the keyword includes defaulted values (e.g., “1*”) at the end of data record, then those values are omitted as omitted columns are interpreted as default values. If there are multiple rows, each with a different number of columns, then the data records are formatted so as to conform to the highest number of columns shown.
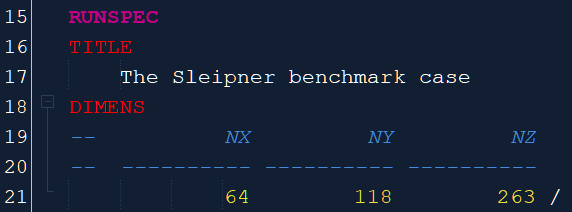
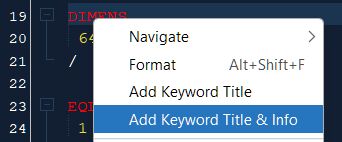
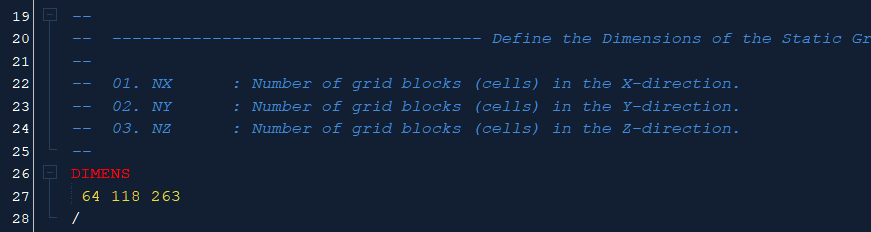
Adding Title and Column Information
To further improve legibility of the simulation input deck, it may be useful to include a summary title that explains the purpose of the keyword and a listing of the columns for that keyword with a brief explanation as to their purpose. This can be accomplished for individual keywords by right clicking the keyword and selecting the selecting the Add Keyword Title or Add Keyword Title & Info option from the context popup menu.
The title is inserted as a comment with a blank line followed by a heading that extends from the left to right margin (120 character width). The column information is added as an ordered list with column names that match the acronyms used for automatic formatting of the keyword and as shown in the build-in Eclipse language manual.
Quick Reference
Keyboard shortcuts applicable to code formatting:
| Shortcut | Action |
|---|---|
| ALT + SHIFT + F | Format selected text according to Eclipse language rules. |
Keyword Navigation
Many integrated development environments (IDEs) offer tools for code navigation, allowing developers to quickly jump between different parts of a file and the files themselves. This feature is especially useful in large simulation input decks, enhancing overall productivity.
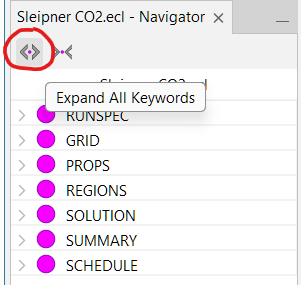
It is possible to jump to any keyword in an Eclipse file directly by using the navigator component. The Navigator window is opened using the CTRL + 7 keyboard shortcut, or via the Navigator option of the Window menu located at the top of the application window. The keywords are organised sequentially into different sections for the Eclipse simulation input deck. To open a section, double-click the section and all keywords for that section are shown. All keywords can be shown by expanding all sections using the Navigator toolbar button to Expand All Keywords. Similarly, it is possible to collapse all sections by using the Collapse All Keywords Navigator toolbar button.
From the listing of keywords in the Navigator, it is possible to jump directly to that keyword in the editor by double clicking on the keyword, or by right-clicking the keyword and selecting the Goto Line option from the context popup menu.
Keywords are visually identified by their type.
- Section keywords are medium violet red.
- Standard keywords are red.
- Arithmetic operations on grid cell array variables are bronze.
- Summary variables are olive drab.
- User-defined actions and quantities are teal.
- OPM Flow-specific keywords are white with red outline.
- Recognised but ignored keywords are grey.
The syntax for each keyword is also indicated on the icon.
- No overlay indicates that no additional data records are expected.
- A single horizontal line indicates a single row vector keyword.
- Two equal horizontal lines indicate a multiple or repeated row vector keyword.
- Two equal vertical horizontal lines indicate a muliple of repeated columnar vector keyword.
- Two unequal horizontal lines indicate a tabular data keyword.
- A single row of three blocks indicates an options keyword.
- A series of three rows of three blocks each indicates an array keyword.
The possible combinations and existing keywords gives rise to the following keyword icons and general syntax for each keyword type:
| Icon | Keyword Type Description |
|---|---|
 |
Section keyword: Keyword indicates the start of a sections in the simulation input deck. Only one section keyword of each type can be included in a simulation input deck. There are no data records that follow the section keyword. There is a subset of permitted keywords for each section. |
 |
Activation keyword: Single keyword with no subsequent data records and no terminating slash. |
 |
Single row vector keyword: Keyword is followed by a single data record which contains a row of one of more data entries. Typically there is a terminating slash following the data record, and (less commonly) a terminating slash for the keyword itself. |
 |
Multiple / repeated row vector keyword: Keyword is followed by a series of data records. Each data record is a single line of data entries that is terminated by a slash. In addition there is usually a separate terminating slash for the keyword. |
 |
Table keyword: These keywords are similar to repeated column vector keywords and multiple row vector keywords. They can be conceptualised as a series of column vector datasets (each of which is a sub-table), with multiple sub-tables arranged into a sequence of data records. Each data record is terminated by a slash and the keyword is also usually terminated by a slash. |
 |
Column vector keyword: Keyword is followed by columnar data records, with data organised into columns, and each line consisting of a full set of entries in each column. There can be more than one set of columns, where each set of columns constitutes a data record. Each data record is terminated with a terminating slash. |
 |
Options keyword: Unlike other keywords, an options keyword can be followed by one of more data entries in no specific order. |
 |
Array keyword: Keyword is followed by a sequence of space de-limited values or repeated values. The keyword usually has a terminating slash to indicate the end of the data array series. Repeated values comprise an integer followed by the “’*’” character and the entry to be repeated. For example, instead of “1 1 1 1” the entry “4*1” can be used. |
 |
Activation arithmetic operation keyword: Single keyword related to arithmetic operations with no subsequent data records and no terminating slash. |
 |
Single row vector arithmetic operation keyword: Keyword related to arithmetic operations is followed by a single data record which contains a row of one of more data entries. Typically there is a terminating slash following the data record, and (less commonly) a terminating slash for the keyword itself. |
 |
Multiple / repeated row vector arithmetic operation keyword: Keyword related to arithmetic operations and is followed by a series of data records. Each data record is a single line of data entries that is terminated by a slash. In addition there is usually a separate terminating slash for the keyword.. |
 |
Activation user defined keyword / quantity: Keyword is used to indicate the start or end of user-defined sections such as user-defined quantities, Python language input scripts, or end of action keywords. There are no data records that follow these keywords. |
 |
Multiple / repeated row vector user defined keyword / quantity: User defined keyword or quantity that takes multiple data records entries. |
 |
Activation variable: Summary variable with no subsequent data records required. This is usually only needed for field summary variables. |
 |
Array variable: Summary variable that can optionally be followed by subsequent data records to define if a subset of the variable is to be saved or, in the case of an empty data record, all possible data is to be saved. |
 |
Activation OPM Flow keyword: Single keyword exclusive to the OPM Flow simulator (will not work with other simulators) with no subsequent data records and no terminating slash. |
 |
Single row vector OPM Flow keyword: Keyword exclusive to the OPM Flow simulator (will not work with other simulators) is followed by a single data record which contains a row of one of more data entries. Typically there is a terminating slash following the data record, and (less commonly) a terminating slash for the keyword itself. |
 |
Multiple / repeated row vector OPM Flow keyword: Keyword exclusive to the OPM Flow simulator (will not work with other simulators) is followed by a series of data records. Each data record is a single line of data entries that is terminated by a slash. In addition there is usually a separate terminating slash for the keyword. |
 |
Table OPM Flow keyword: These keywords exclusive to the OPM Flow simulator (will not work with other simulators) are similar to repeated column vector keywords and multiple row vector keywords. They can be conceptualised as a series of column vector datasets (each of which is a sub-table), with multiple sub-tables arranged into a sequence of data records. Each data record is terminated by a slash and the keyword is also usually terminated by a slash. |
 |
Column vector OPM Flow keyword: Keyword exclusive to the OPM Flow simulator (will not work with other simulators) is followed by columnar data records, with data organised into columns, and each line consisting of a full set of entries in each column. There can be more than one set of columns, where each set of columns constitutes a data record. Each data record is terminated with a terminating slash. |
 |
Array OPM Flow keyword: Keyword exclusive to the OPM Flow simulator (will not work with other simulators) is followed by a sequence of space de-limited values or repeated values. The keyword usually has a terminating slash to indicate the end of the data array series. Repeated values comprise an integer followed by the “’*’” character and the entry to be repeated. For example, instead of “1 1 1 1” the entry “4*1” can be used. |
 |
Ignored keyword: This keyword is a known keyword in other Eclipse language dialects (used by other simulators) but is ignored by OPM Flow. |
Quick Reference
Keyboard shortcuts applicable to keyword navigation:
| Shortcut | Action |
|---|---|
| CTRL + 7 | Open Navigator window. |
Error Highlighting
The Eclipse language editor highlights syntax errors encountered during parsing of an input deck. This allows basic errors to be detected and fixed prior to running of a simulation deck, thus speeding up the time taken to create a working simulation input deck. A deck that shows errors in the Eclipse editor may still run in a simulator (especially if the errors are not serious), however it is good practice to clean all simulation input decks so that they are free of errors.
Types of Errors Detected
There are several different types of error that are detected.
-
Incorrect use of keywords (typically a typographic error) will flag as an error. Here the EQLDIMS keyword has been misspelt as EQLDIM and is flagged as an unknown keyword.
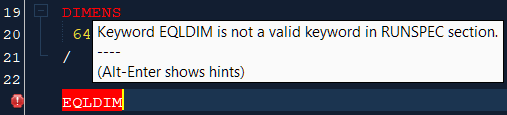
Unrecognised keyword error. -
For keywords followed by data records, each parameter in the data record is expected to have a specific type such as an integer or single quoted string. If the data parsed in the data record does not conform to the expected type, then an error is flagged. In the example below a positive integer is expected for the first parameter value, so the value of -1 is invalid.

Incorrect data record parameter type. -
Some keywords, particularly row vector and tabular keywords, expect a certain number of parameters to be included in a data record. If there are more parameters than expected, then an error will be flagged. Note that for some keywords, additional parameters may be valid for simulators other than OPM Flow. The error is flagged just for the OPM Flow simulator. Note that in the example below two default values are declared, rather than just one, meaning that the final parameter entry is erroneous as it would be the sixth parameter for the keyword, and this does not exist for that keyword.

Erroneous number of expected parameters encountered. -
Syntax errors. There is little in the way of apparent consistency for the application of terminating slashes associated with keywords in the Eclipse language. Missing or additional terminating slashes that do not conform to the expected structure of each keyword are flagged as errors.
Note that the Pyrus Suite prefers that string parameters used in keyword data records are entered as single quoted strings rather than unquoted strings. Therefore, any unquoted strings are marked as an error. This is intentional. To fix the errors, all that is required is to reformat the keyword, which will convert all unquoted strings into single quoted strings for that keyword.
Diff Versioning
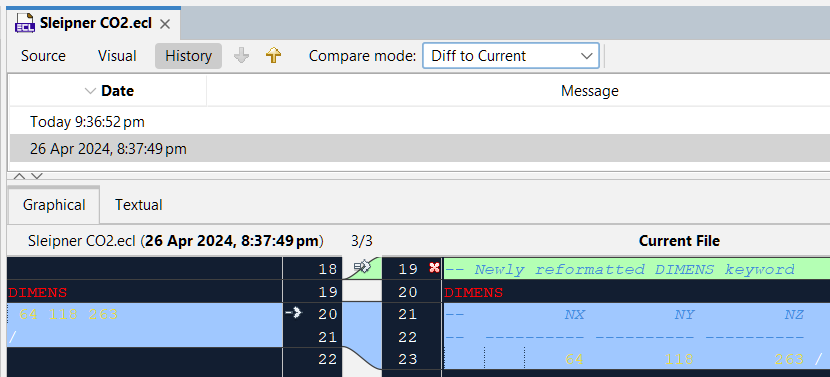
Version control systems such as Git and Subversion are commonly used to track changes to program code. The Pyrus Suite includes a local versioning system provided by the NetBeans platform, that allows individual changes made to a file to be tracked and compared between saved versions of a file. These changes can be compared and rolled back if required.
A snapshot of a file is made every time that file is saved. The local history for the file can be selected to compare the differences between the current file and any previously saved local version. Additions to the file are shown as green bands, deletions as red bands, and changes as blue bands. Because multiple versions of a file are saved, it should not be necessary to save multiple versions of a file in case it is necessary to roll back changes.
A feature of the local history is that it is possible to just roll back single changes at a time. It is not necessary to restore the entire file to a prior state. This means that if only a small portion of the file needs to be rolled back, then that is possible.
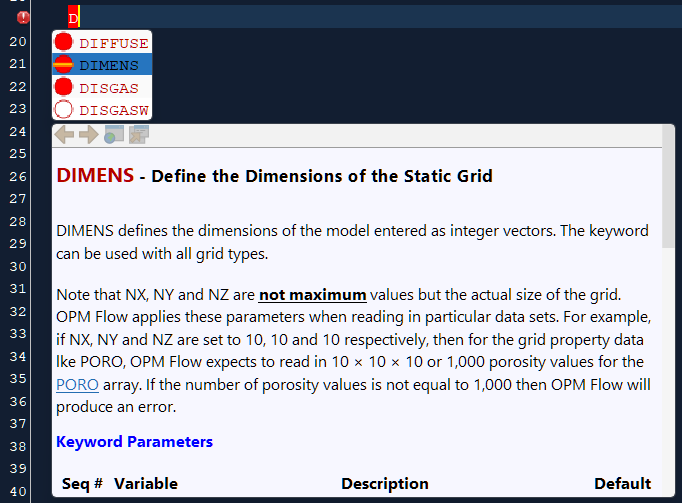
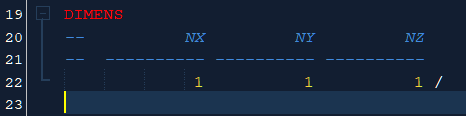
Language Manual
The Eclipse language editor provides synchronised access to keyword documentation in the form of an in-built manual. The purpose of the manual is to provide consistent information concerning the function and syntax for different keywords that can be used in a simulation input deck. Note that this is distinct to this Pyrus Manual which includes information on use of the Pyrus Suite and recommendations concerning how to create reservoir simulation decks for different purposes.
Use of an external manual, often in portable document format (PDF), is the conventional method which the different dialects of the Eclipse language have used to document the syntax and parameters for various keywords. Whilst comprehensive, this is a cumbersome approach that requires the user to look up the keywords using a different program, or to refer to a printed copy. This can be time-consuming as the manuals often run to thousands of pages. In addition, browsing the manuals can be difficult, and it is often not possible to browse back through the page history; functionality that is standard on most web browsers.
The Pyrus Suite includes a built-in manual for the Eclipse language that is based on the open-source OPM Flow manual. This contains a description and full syntax, including example usage, for each keyword supported by OPM Flow. Since the manual is built into the Pyrus Suite, this makes it easy to access the documentation within the Eclipse editor itself. For example, when using code completion for keywords, a popup showing the manual entry for each possible keyword is shown. The manual also allows for synchronisation of the manual page shown and the cursor position in the Eclipse editor. When synchronisation is enabled (it is on by default) the manual will show the documentation for the current keyword that is being edited. This eliminates the need to look up the keyword in the manual as it is automatically displayed.
Accessing Eclipse Language Manual
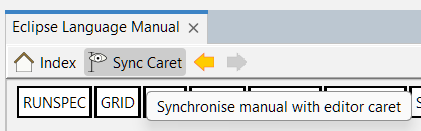
The Eclipse language manual opens as a separate window in the Pyrus Suite. Only one Eclipse language manual window can be open at any time. The window can be moved and docked into different positions within the application windowing system framework. Typically, having the manual open in a separate window to the Eclipse editor means that the Eclipse simulation input deck and the manual can be viewed concurrently. This allows the full benefit of the synchronisation of between the editor and the page displayed in the manual to be realised. There are several ways that the Eclipse language manual can be opened:
- Keyboard shortcut: CTRL + F1.
- Context popup menu: Right-click in an Eclipse editor window and select the Eclipse Language Manual option.
- Menu: Select Eclipse Language Manual from the Help menu located at the top of the application window.
- Toolbar: Eclipse language manual button is found on the Tools toolbar. If this is not showing, then check that the Tools toolbar is active by right clicking on the toolbar area. There should be a blue tick next to the Tools entry to indicate that it is active.
Navigating Eclipse Language Manual
By default the Eclipse language manual has synchronisation turned on. This can be disabled via the sync button on the toolbar in the manual window. Doing so allows the manual to be browsed without the page changing when the cursor position changes in an Eclipse editor window. Browsing the manual with synchronisation enabled is also possible, but the page will automatically switch to the current keyword that is being edited if the cursor position changes in an Eclipse editor window.
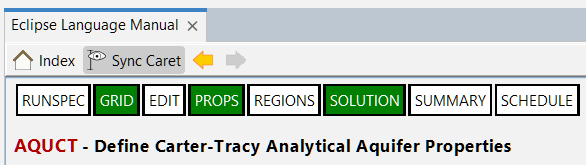
The top of each page contains eight blocks that correspond to each section of the Eclipse simulation input deck. Clicking on one of these blocks will open a page that lists all the keywords that are supported for that section by the OPM Flow simulator. Currently only keywords supported by OPM Flow are listed, but this may be expanded to include other Eclipse language dialects in the future.
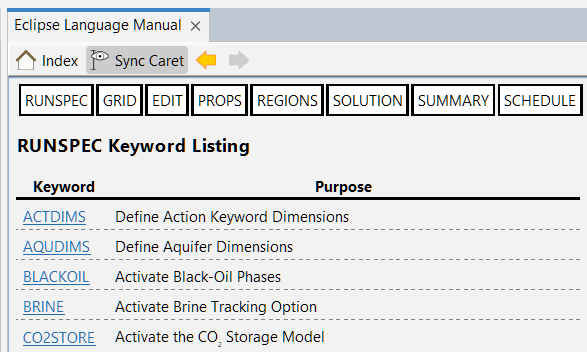
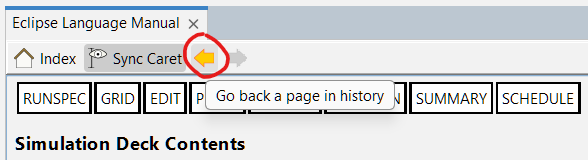
The Eclipse language manual is, in essence, a built-in mini web browser that displays HTML pages for each keyword. The page view history can be navigated using the back and forward buttons, just as in a conventional web browser. The “Index” button is an overview page from which all pages and sections in the manual can be reached.
Finally, it should be noted that the section blocks at the top of each keyword manual page are colored according to the applicability of each section for that keyword. If the keyword can be used in the named section, then it will be coloured green. If the keyword is not applicable to that section, it will be coloured white. In the example below the keyword AQUCT can be used in the GRID, PROPS and SOLUTION sections.
Quick Reference
Keyboard shortcuts applicable to the Eclipse language manual:
| Shortcut | Action |
|---|---|
| CTRL + F1 | Open Eclipse language manual. |