A previous approach to improving the quality of life when dealing with the input text files for OPM Flow was to implement syntax highlighting in Notepad++ which aided the readability of the simulation deck by indicating the meaning of text via colour. There were some shortcomings with this implementation and it led to the question as to whether it could be improved on and if other quality of life improvements could also be brought to bear.
I’ve been working on implementing a proper reservoir simulation deck editor for the NetBeans platform for a few weeks now, and have made good progress. This article demonstrates what has been achieved so far and the planned way ahead.
Writing an Editor for ECLIPSE Decks
The standard input form for a reservoir simulation is a simple text file. Text editors are ubiquitous in the computing world, and editing these files is thus a relatively easy task in comparison to some of the other formats that are encountered in the oil and gas industry.
Programs are also written using text files which are then compiled (or interpreted) to produce the desired behaviour. A variety of different techniques have arisen over many years to improve and facilitate the editing of these text files:
- Syntax highlighting: Within any programming language, certain words are “reserved” and have a particular function and purpose in that language. The use of these words, in combination with the known grammar of the language, indicates that other words are either identifiers (variable names), or values such as numbers or strings. By leveraging the known structure of a language, colour can be applied to the words in a text file to highlight the purpose of the text in the context of that language i.e., to reveal and emphasise the syntax of the text. This is a powerful feature that greatly aids readability of the text file
- Code folding: Programs tend to be made up of blocks of statements with a defined start and end. In a lengthy program there can be thousands of lines of code in any given file. This can make scrolling through the document to find a specific block or statement quite tedious. Code folding allows blocks of text such as multi-line comments and statements to be collapsed to a single line when displayed. This allows much more of the program structure to be seen and understood on a single display.
- Error checking: Typos are a fact of life. Most integrated development environments (IDEs) will highlight basic errors such as these without the need to attempt to compile or run the program. More advanced IDEs can even detect common input errors which would compile and run, but lead to subtle bugs in the program; a process known as linting.
- Code completion: Writing code can be a repetitive exercise. Often when writing sections of code, it is reasonably predictable what is needed to complete a statement. A good IDE will offer to complete writing statements once it is fairly certain what the remaining text should look like. This greatly speeds up writing.
- Documentation on hover: Information about keywords and the expected syntax can be provided as a hint when the mouse cursor hovers over that keyword. This can greatly aid the utility of the editor as the need to constantly reference a separate manual is removed.
- Reformatting: In any text document, as a general rule, whitespace and comments do not hold any meaning, and are skipped over when interpreting the file. However, this means that files can, and do, easily become a mess of different styles. This becomes more pronounced when cut and paste from other code is used. A good IDE will effortlessly tidy up messy files to produce consistently formatted documents with the desired whitespace and comments that wrap to a desired row length.
- Refactoring: This is essentially a more powerful version of a find and replace. A good IDE can not only mark all occurrences of a specific word in a text document, but will also intelligently replace all usages of that word with a different one, even in related files that refer to the code being changed.
This is by no means an exhaustive list, and there are many other useful features that have been devised to assist with writing code. Previously I had implemented some basic syntax highlighting using Notepad++ for ECLIPSE input decks. I personally found this to be incredibly useful, and was surprised to learn that did not appear to be any prior implementations. Whilst the Notepad++ syntax highlighting was useful, there were a few shortcomings and the question I had to ask was, “can I do better?”.
Ideally I would be able to incorporate an editor into the Pyrus Suite which is built on the NetBeans platform, and NetBeans is itself used as an IDE for a variety of different languages. This platform is extendable to other languages, and eventually I had what was, in hindsight, a fairly obvious epiphany… why not use the NetBeans platform to write an IDE for ECLIPSE files. Almost all of the underlying plumbing has already been created. All I would need to do it plug into it and define the rules for the ECLIPSE language.
Inevitably this was a bigger task than I had optimistically envisaged. However, just a couple of weeks after I had embarked on this quest, I’ve managed to implement syntax highlighting, cold folding and error detection (as well as a few bonus features). This blog post explains how I went about the implementation and some interesting things I learned along the way. In the not to distant future I hope to finally release a version of Pyrus that will allow others to use the ECLIPSE editor.
Proof of Concept NBM Plugin for NetBeans IDE
In the spirit of don’t run before you can walk, a single NetBeans module to provide language support for the NetBeans IDE has first been developed. This module should then, in theory, also be usable within the Pyrus Suite. The advantage of developing the plugin as a standalone IDE module is that there are no dependencies on any Pyrus code, and the module can be tested directly within a copy of the IDE.
Syntax Highlighting
Syntax highlighting does not require any special functionality to enable it. The ECLIPSE file type is recognised by its MIME type file extension (text/x-eclipse) and the IDE knows to use the Eclipse editor top component when opening this file type by default. The default colours have been designed to work with the “Norway Today” theme included with NetBeans. This is a dark theme that works well for me, although I suspect others may hold an opinion that it is something of an angry fruit salad.
Tokens recognised by the lexer are automatically coloured according to their types:
| Token Type | Colour |
|---|---|
| Section Keyword | Bold Magenta |
| Keyword | Red |
| Mathematical Operation Keyword | Bronze |
| User Defined Quantity Keyword | Cyan |
| OPM Flow Specific Keyword | Italic Red |
| OPM Unsupported Keyword | Italic Grey |
| Grid Cell Variable | India Green |
| Summary Variable | Light Green |
| User Defined Variable | White |
| Number | Yellow |
| Quoted String | Yellow |
| Unquoted String | Yellow |
| Terminating Slash | White |
| Comment | Light Blue |
| Text | White |
Whilst this initially appears that there are many different colours that could clash, the logic is that colours appear in groups, so aid in identification of different keywords simply by the syntax highlighting used for that keyword.
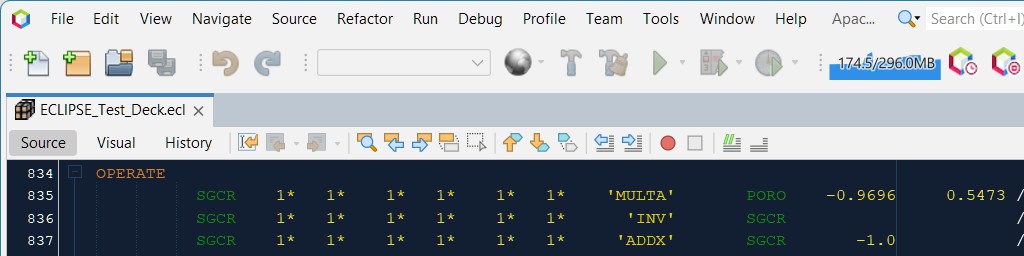
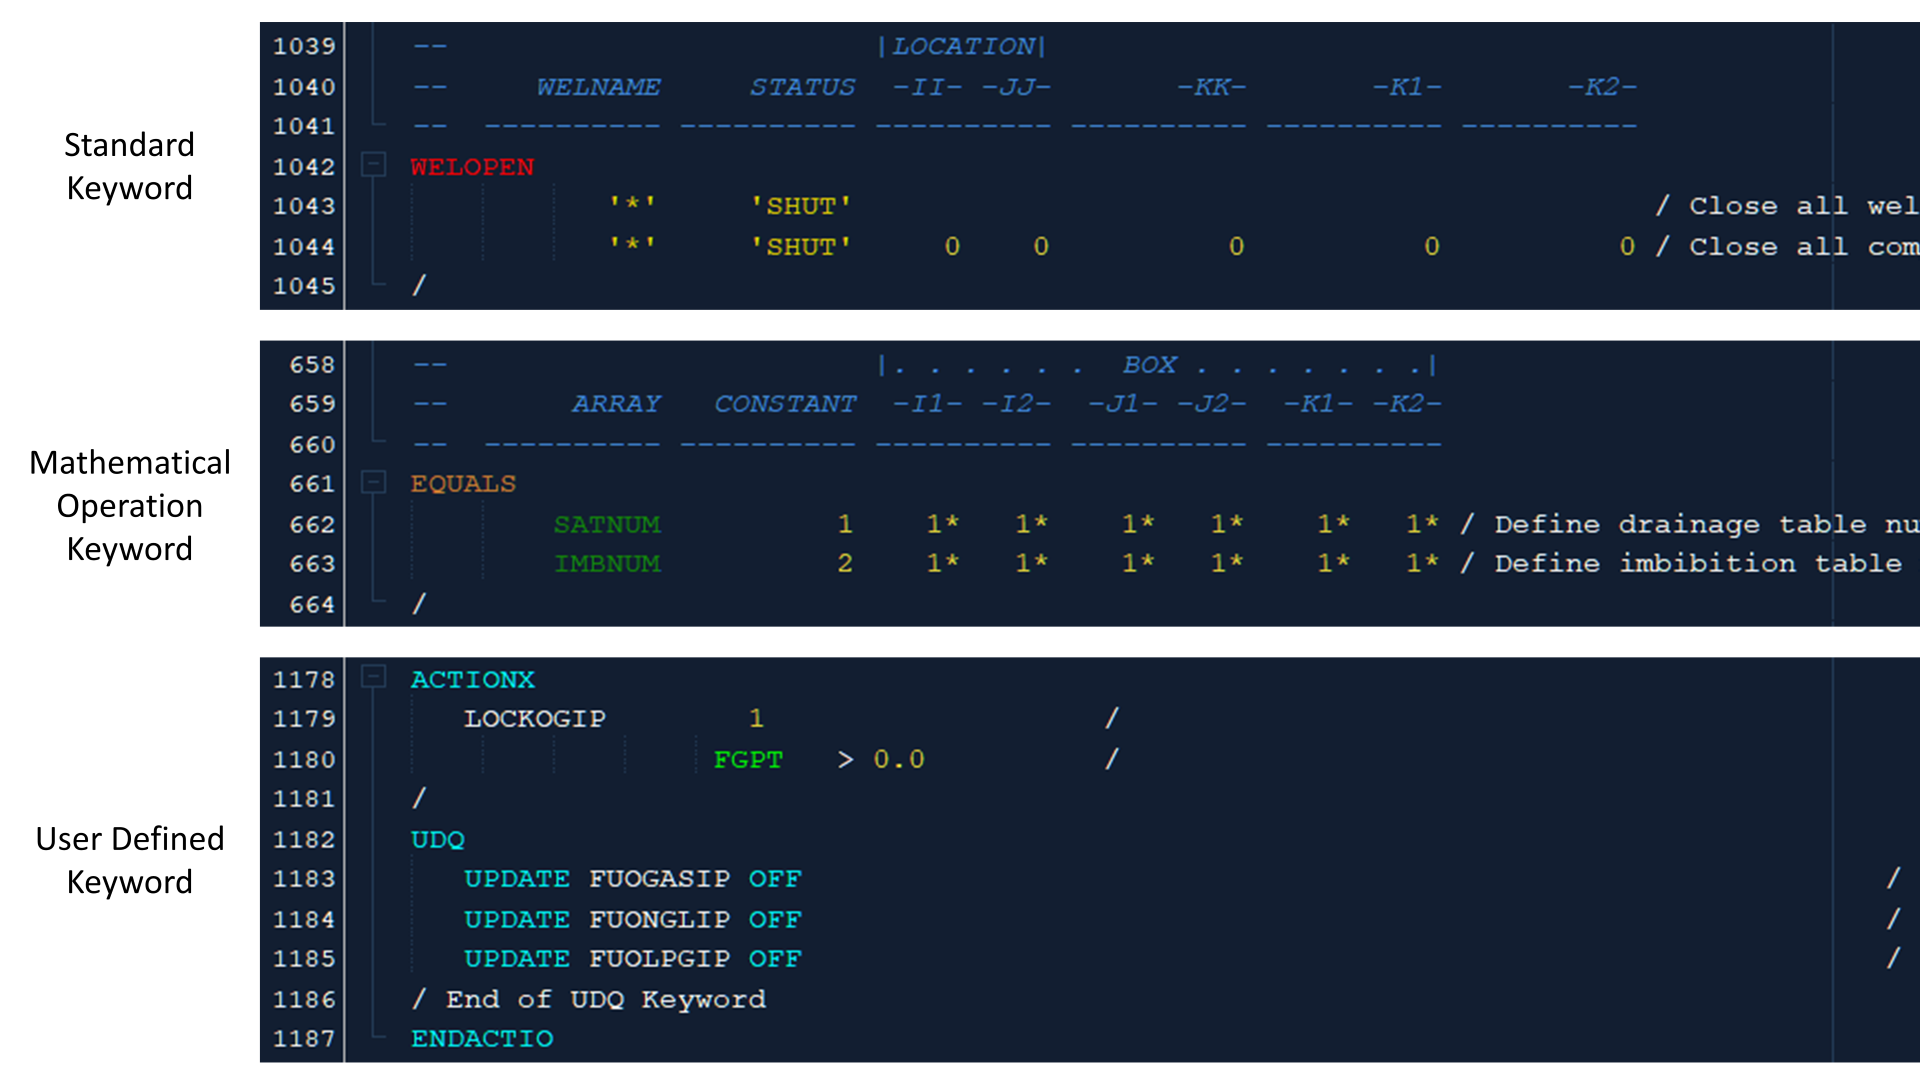
For example, many keywords are standalone activation keywords, or associated with array data, row data or column data that comprises numbers and strings, both with and without terminating slash characters. These blocks of keywords will appear as a combination of red, yellow and white text. Mathematical operation keywords such as OPERATE, ADD etc. are bronze, and are associated with numbers and strings (yellow), grid cell variables (forest green) and terminating slashes (white). Finally, user defined quantity keywords such as UDQ or ACTIONX use cyan for the keywords, light green for any summary variables included in expressions, white colour for user-defined variables or operators and terminating slashes, and yellow for numbers and strings. The use of different colours means that the blocks of mathematical operation keywords or user defined quantity keywords appear distinct from the conventional keywords.
This can be seen in the following figure which compares the three different blocks just mentioned.
As the ECLIPSE editor is written with the OPM Flow simulator in mind, there is also special treatment for certain keywords. Keywords such as PVTSOL that are recognised only by OPM Flow are shown in italics, and recognised but unsupported keywords are shown in grey. Other commercial simulation programs such as tNavigator that also have their own proprietary keywords, will initially appear as keywords in bold red, but will also be marked as a potential error as the keyword is not recognised.
Code Folding
Moving on from syntax highlighting we have code folding. For most languages this is relatively straightforward as multi-line comment blocks have a distinct start and end, as do methods and other similar statements which are defined by their start and end braces.
In the ECLIPSE language there are no braces via which detection of the start and end of a keyword or comment block can be achieved. The simplest case are multi-line comments which are just a sequence of single line comments. This is reasonably easy to detect. When single line comment is encountered, if the next line is also a single line comment or empty, then add it to the fold block. This logic continues until a line that is not empty or a single line comment is encountered.
Keywords are more difficult. To wrap our keywords in a code fold, we have to define the start and end of the keyword. Defining the start is relatively easy, as it is simply triggered every time a keyword is encountered in the token sequence. However, the end is not as straightforward. Logically one might define this as the token before the next keyword (with the exception of ACTIONX keywords, there is no nesting of keywords). However, what if there are comments before the next keyword? In that case we must define the end of the fold as the line prior to the next keyword that is not a single line comment or an empty line.
In practice the user does not need to concern themselves with any of this. The code folds appear in the left margin of the editor as little ‘+’ or ‘-‘ symbols and can be collapsed or expanded by clicking on the fold. A very useful function is the option to collapse all folds at once with the shortcut Ctrl + Shift + -. This collapses blocks of comments and keywords into a single line each. Note that the folded blocks indicate whether the fold contains a comment, or a keyword, and shows how many lines are folded. This makes it much easier to see the overall structure and purpose of an ECLIPSE deck at a glance.

The reverse operation, to expand all folds, is accomplished using the shortcut Ctrl + Shift + +.
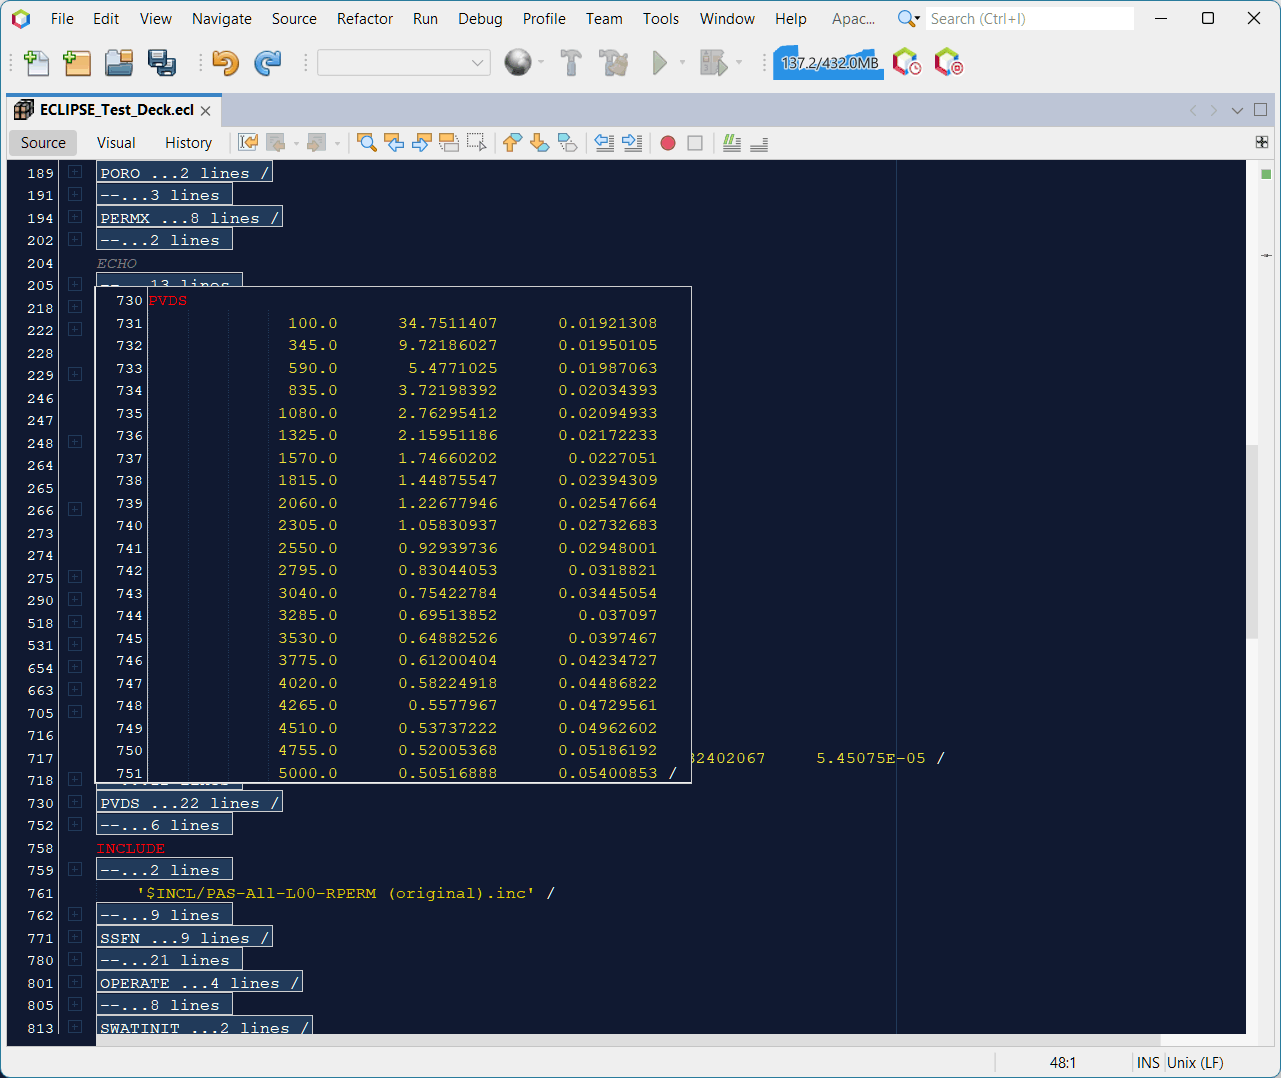
Once you have collapsed all the folds, whilst it is much easier to get a birds eye view of the simulation deck structure, the detail for individual keywords is now hidden. Hovering over a folded block will reveal the text that has been folded, without needing to expand and then collapse the fold again just to peek at the contents. The example shown here hovers over the folded PVDS keyword to reveal the content of that keyword.
A special case concerns ACTIONX keywords as another ACTIONX keyword can be embedded within another, and indeed other keywords can be triggered once the conditions for the action are satisfied. Our previous logic to end the fold block when the next keyword is encountered will not work. However, we can instead look for an ENDACTIO keyword that denotes the end of the ACTIONX block. By keeping a running count of the number of ACTIONX keywords encountered, and decrementing this count every time an ENDACTIO keyword is encountered, a basic way to wrap an entire ACTIONX keyword with a code fold can be implemented. This does not allow for nesting of keywords within the action, although this is planned for the future.
Error Checking
With just syntax highlighting and code folding, our ECLIPSE editor is already much more useful than a plain text editor. However, these features just aid with readability and scrolling of the document. They don’t really assist with writing the simulation deck itself.
For a basic implementation of error checking, we can leverage a parser to ensure that the syntax of our simulation deck is correct, and highlight where inconsistencies against the expected format are encountered.
The main challenge with implementing error checking using JavaCC on the NetBeans platform is related to ensuring that the correct token is highlighted and that a sensible message is presented to the user so that there is guidance as to how the error can be resolved.
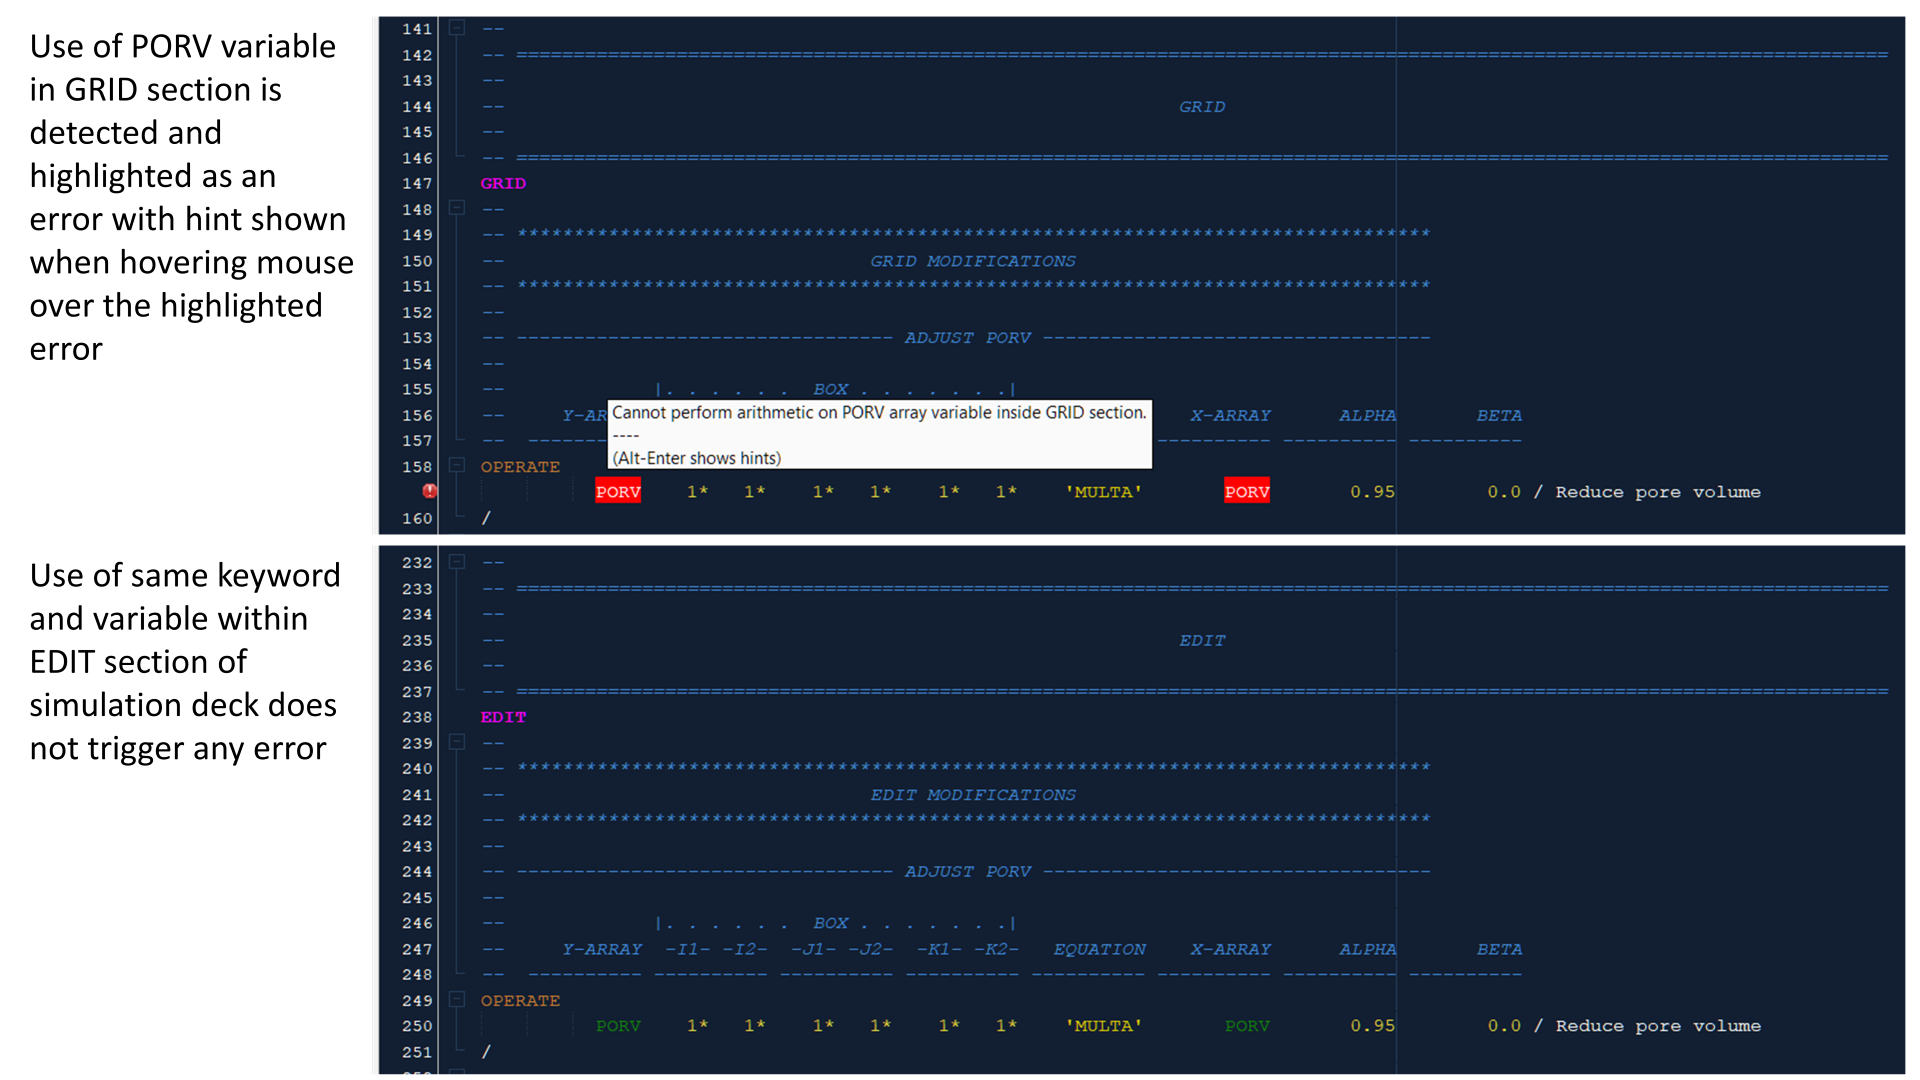
As an example consider the OPERATE keyword. In the EDIT section this can be used to define a value for the PORV grid cell variable, but this is not allowed in the GRID section. The parser is aware of which section the keyword is located, and is able to flag the incorrect usage of this variable in the GRID section, but no error is presented for the exact same keyword in the EDIT section.
Error checking runs continually on a background thread, and as changes are made to the simulation deck, errors are added and removed.
Tracking Changes and Other Useful Tools
A massive benefit of re-purposing the NetBeans IDE for the ECLIPSE language is that so much functionality of the NetBeans editor comes along for free. Basic shortcuts for manipulation of text include:
- Ctrl + Shift + R
Column/block editing. Exceptionally useful for editing columns of data in a tabular keyword. - Ctrl + Shift + ↑
Duplicate lines above. - Ctrl + Shift + ↓
Duplicate lines below. - Alt + Shift + ↑
Move lines up. - Alt + Shift + ↓
Move lines down. - Ctrl + E
Elide a line (remove the line). Honestly, this is one of the most useful shortcuts I know. Quite how I used to edit text before I came across this is a mystery. It is so much faster than selecting from the start of a line to the end of a line and then deleting.
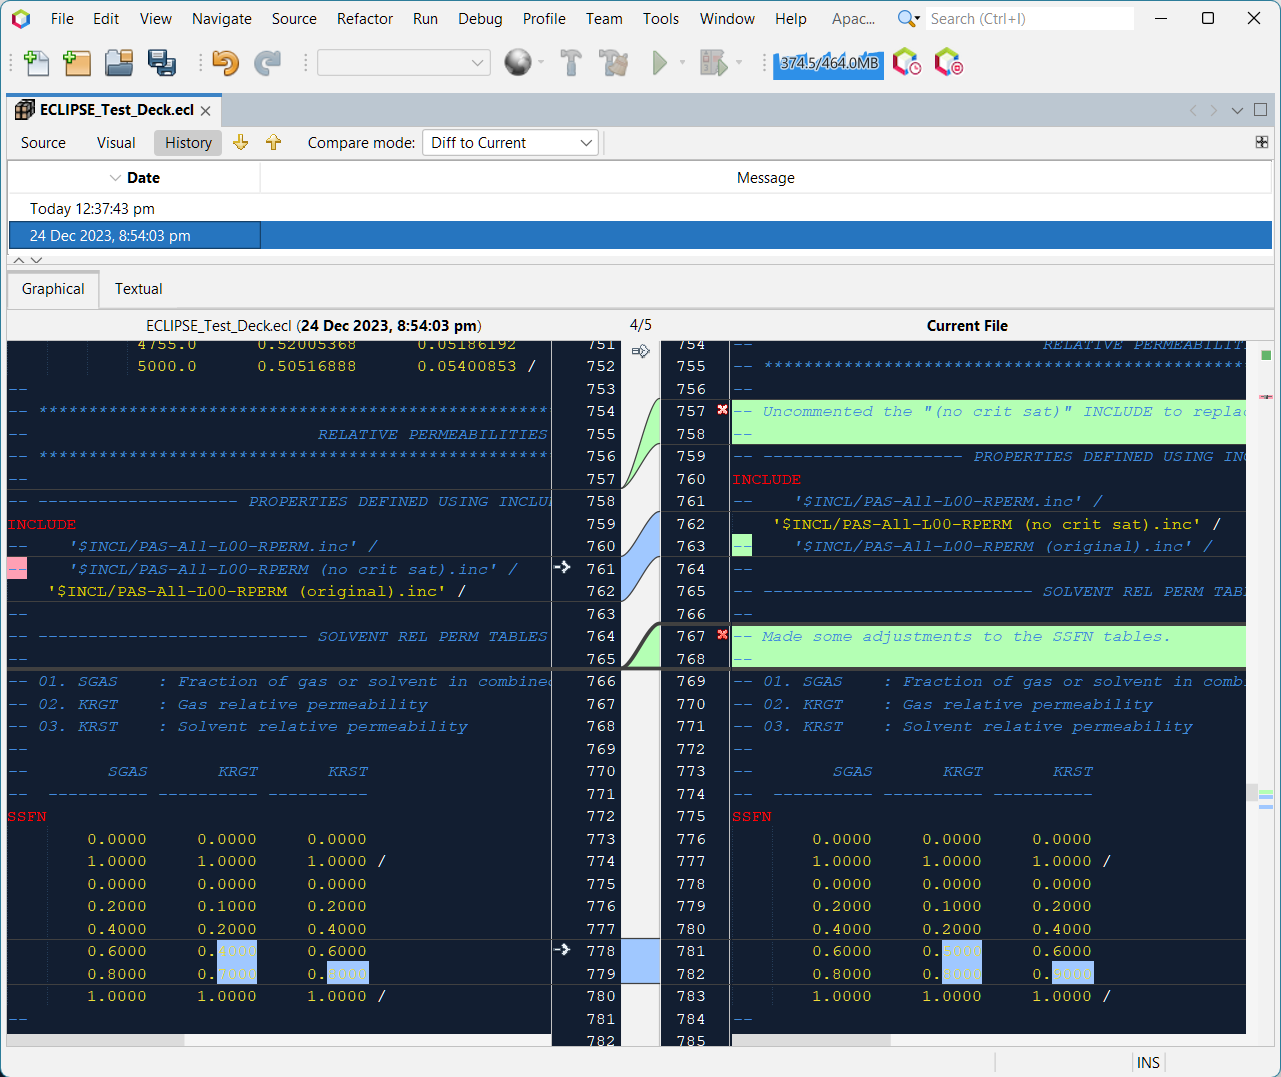
In addition to the standard NetBeans keyboard shortcuts for text manipulation, there is the local history for a document. This allows a track history of changes made to a document via what is known as a Diff against earlier versions. The changes are highlighted graphically as insertions, deletions and changes, and it is easy to revert to earlier versions if needed.
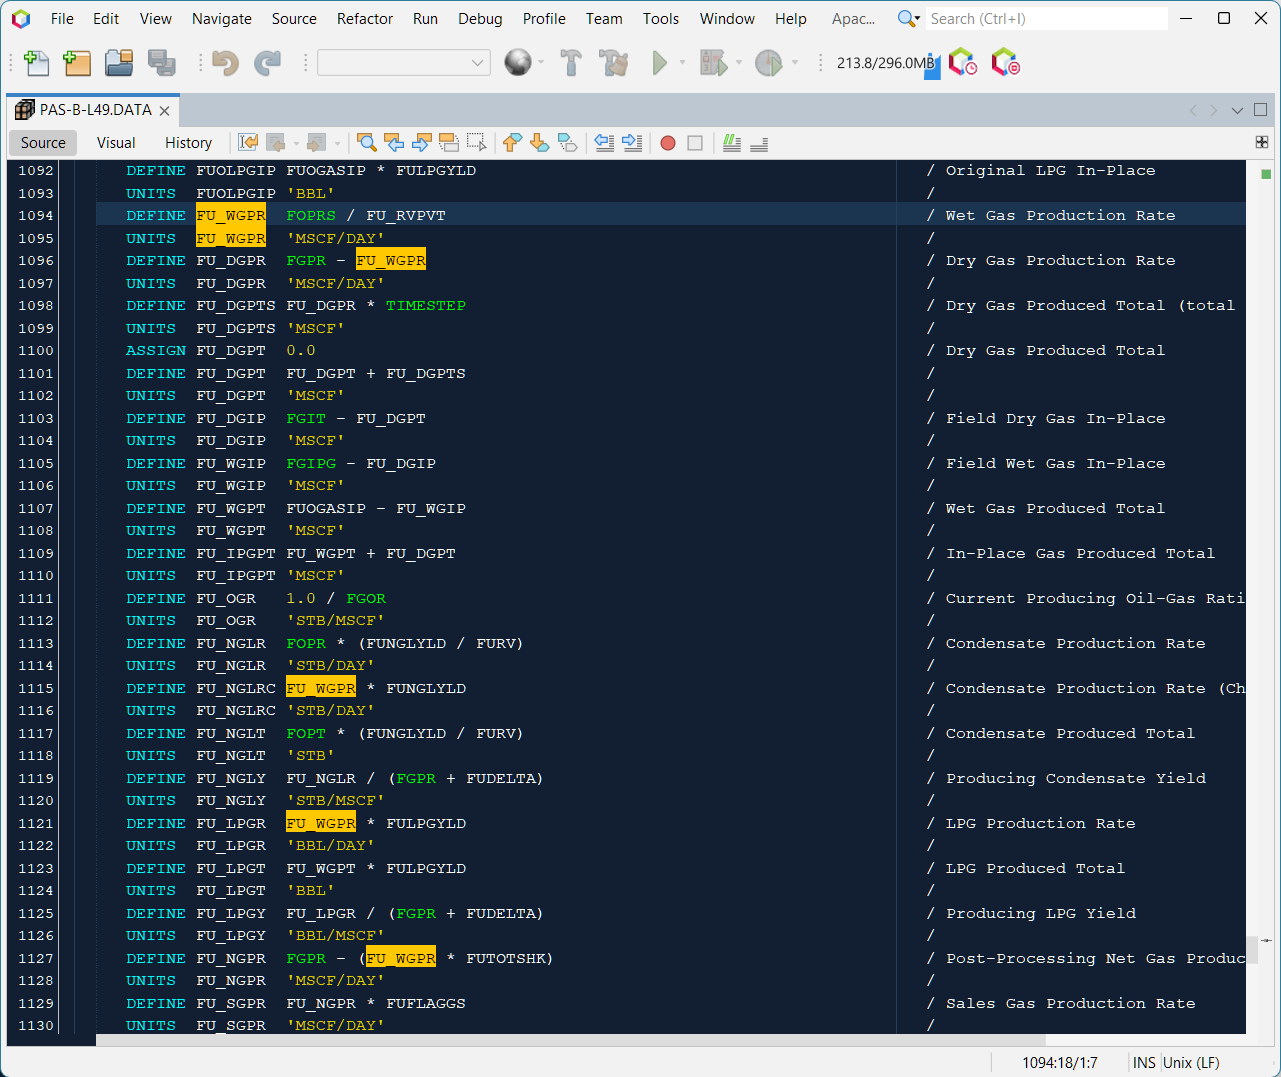
There is also the ability to mark similar occurrences. This is not necessarily that useful in an ECLIPSE deck, but it is possible nonetheless. When writing user defined quantities, it can be helpful to see where previously defined terms are used. Double clicking on a variable will highlight where else that variable is used in the document.
Next Steps
Less than a month on from starting this little project to develop an ECLIPSE plugin for the NetBeans IDE and some tangible progress is evident. Already the editor is proving much more useful than the previous approach which was to use some custom syntax highlighting in Notepad++.
The next steps are:
- Introduce code completion for recognised keywords including provision of documentation.
- Reformatting of the simulation deck to enforce pretty spacing and consistent column widths, plus the optional addition of keyword documentation in comments.
- Introduce code templates, snippets and generation for commonly used keywords.
- Incorporate plugin into a standalone Pyrus distributable program that can be freely downloaded for use by others in the oil and gas industry.